Tenny's Blog


  • 首页

  • 分类

  • 关于

  • 归档

  • 标签

  • 搜索

zookeeper入门

发表于 2017-05-04 | 分类于 zookeeper

zookeeper 简介

Zookeeper 分布式服务框架是 Apache Hadoop 的一个子项目,它主要是用来解决分布式应用中经常遇到的一些数据管理问题,如:统一命名服务、状态同步服务、集群管理、分布式应用配置项的管理等。

zookeeper 单机使用

访问http://zookeeper.apache.org/releases.html 并下载最新版本的ZooKeeper,这里我使用的版本是3.4.8。

下载完成后解压缩。进入conf目录,创建zoo.cfg配置文件(可复制已有的zoo_sample.cfg修改)。

1
2
3
4
5
tickTime=2000
initLimit=10
syncLimit=5
dataDir=/tmp/zookeeper
clientPort=2181

说明一下几个配置项的意义(initLimit和syncLimit暂时先不管,后面有说明):

  • tickTime:这个时间是作为 Zookeeper 服务器之间或客户端与服务器之间维持心跳的时间间隔,也就是每个 tickTime 时间就会发送一个心跳。
  • dataDir:顾名思义就是 Zookeeper 保存数据的目录,默认情况下,Zookeeper 将写数据的日志文件也保存在这个目录里。
  • clientPort:这个端口就是客户端连接 Zookeeper 服务器的端口,Zookeeper 会监听这个端口,接受客户端的访问请求。

保存配置文件,返回进入bin目录,双击zkService.cmd启动服务,控制台看到如下启动信息:

1
2
3
4
5
...
2017-05-04 16:42:38,924 [myid:] - INFO [main:ZooKeeperServer@787] - tickTime set to 2000
2017-05-04 16:42:38,924 [myid:] - INFO [main:ZooKeeperServer@796] - minSessionTimeout set to -1
2017-05-04 16:42:38,925 [myid:] - INFO [main:ZooKeeperServer@805] - maxSessionTimeout set to -1
2017-05-04 16:42:38,993 [myid:] - INFO [main:NIOServerCnxnFactory@89] - binding to port 0.0.0.0/0.0.0.0:2181

再双击zkCli.cmd启动客户端,控制台显示如下信息:

1
2
3
4
...
WATCHER::
[zk: localhost:2181(CONNECTED) 0]
WatchedEvent state:SyncConnected type:None path:null

ZooKeeper客户端用于与ZooKeeper服务器进行交互,下面来进行简单的操作。

创建Znodes

创建具有给定路径的znode。

语法

1
create /path data

示例:

1
2
create /FirstZnode "myfirstzookeeper-app"
Created /FirstZnode

使用参数可以指定创建的节点模式CreateMode,CreateMode有下面几种:

  • PERSISTENT:创建后只要不删就永久存在

  • EPHEMERAL:会话结束年结点自动被删除,EPHEMERAL结点不允许有子节点

  • SEQUENTIAL:节点名末尾会自动追加一个10位数的单调递增的序号,同一个节点的所有子节点序号是单调递增的

  • PERSISTENT_SEQUENTIAL:结合PERSISTENT和SEQUENTIAL

  • EPHEMERAL_SEQUENTIAL:结合EPHEMERAL和SEQUENTIAL

默认情况下,所有znode都是持久的。

创建Sequential znode,请添加-s标志,语法如下

1
create -s /path data

示例:

1
2
[zk: localhost:2181(CONNECTED) 1] create -s /FirstZnode "second-data"
Created /FirstZnode0000000006

创建Ephemeral Znode,请添加-e标志,语法如下

1
create -e /path data

示例:

1
2
[zk: localhost:2181(CONNECTED) 2] create -e /SecondZnode "Ephemeral-data"
Created /SecondZnode

当客户端连接丢失时,临时znode将被删除。下面我们会通过退出ZooKeeper客户端,然后重新打开zkCli来验证。

获取数据

获取znode的数据,包括数据上次修改的时间,修改的位置等其他相关信息。

语法

1
get /path

示例:

1
2
3
4
5
6
7
8
9
10
11
12
13
[zk: localhost:2181(CONNECTED) 3] get /FirstZnode
myfirstzookeeper-app
cZxid = 0x151
ctime = Thu May 04 17:02:34 CST 2017
mZxid = 0x151
mtime = Thu May 04 17:02:34 CST 2017
pZxid = 0x151
cversion = 0
dataVersion = 0
aclVersion = 0
ephemeralOwner = 0x0
dataLength = 20
numChildren = 0

访问Sequential znode,必须输入znode的完整路径,语法如下

1
get /path00000000xx

示例:

1
2
3
4
5
6
7
8
9
10
11
12
13
[zk: localhost:2181(CONNECTED) 4] get /FirstZnode0000000006
second-data
cZxid = 0x152
ctime = Thu May 04 17:10:34 CST 2017
mZxid = 0x152
mtime = Thu May 04 17:10:34 CST 2017
pZxid = 0x152
cversion = 0
dataVersion = 0
aclVersion = 0
ephemeralOwner = 0x0
dataLength = 11
numChildren = 0

这里我们来验证Ephemeral Znode。

先获取一次:

1
2
3
4
5
6
7
8
9
10
11
12
13
[zk: localhost:2181(CONNECTED) 5] get /SecondZnode
Ephemeral-data
cZxid = 0x153
ctime = Thu May 04 17:13:21 CST 2017
mZxid = 0x153
mtime = Thu May 04 17:13:21 CST 2017
pZxid = 0x153
cversion = 0
dataVersion = 0
aclVersion = 0
ephemeralOwner = 0x15bd2a018370000
dataLength = 14
numChildren = 0

关闭zkCli命令行窗口,等待40s,重启客户端,再次尝试获取:

1
2
get /SecondZnode
Node does not exist: /SecondZnode

可以看到临时znode已经不存在了,而永久节点是存在的:

1
2
3
4
5
6
7
8
9
10
11
12
13
[zk: localhost:2181(CONNECTED) 1] get /FirstZnode
myfirstzookeeper-app
cZxid = 0x151
ctime = Thu May 04 17:02:34 CST 2017
mZxid = 0x151
mtime = Thu May 04 17:02:34 CST 2017
pZxid = 0x151
cversion = 0
dataVersion = 0
aclVersion = 0
ephemeralOwner = 0x0
dataLength = 20
numChildren = 0

这里说一下,客户端连接断了之后,ZK不会马上移除临时数据,只有当SESSIONEXPIRED之后,才会把这个会话建立的临时数据移除。

而SESSIONEXPIRED是取决于客户端和服务端两方面的。

zk server端timeout参数:

  • tickTime:zk的心跳间隔(heartbeat interval),也是session timeout基本单位,单位为微妙。
  • minSessionTimeout: 最小超时时间,zk设置的默认值为2*tickTime。
  • maxSessionTimeout:最大超时时间,zk设置的默认值为20*tickTime。

我们配置文件的tickTime为2000,所以这里服务端最大超时时间为20*2000ms = 40s。

zk client端timeout参数:这里cmd命令行不清楚怎么设置,但是应该也有默认的值,不过默认值也不知道= =!。

查看zookeeper源码可知,服务端拿到客户端的超时时间后,是会做一些判断的,客户端超时时间实际限制在{2*tickeTime, 20*tickTime}范围内。假设客户端设置了timeout为100s,实际40s就已经超时了;类似如果客户端设置timeout为1s,也要等到4s才超时。

回到我们的测试,建立临时节点,如果关闭客户端后立刻(4s内)连接上,临时节点仍然存在,而等待40s后session一定过期,临时节点就被删除了。

设置数据

设置指定znode的数据。

语法

1
set /path data-updated

示例:

1
2
3
4
5
6
7
8
9
10
11
12
[zk: localhost:2181(CONNECTED) 4] set /FirstZnode "myfirstzookeeper-app1.1"
cZxid = 0x151
ctime = Thu May 04 17:02:34 CST 2017
mZxid = 0x15d
mtime = Thu May 04 17:46:18 CST 2017
pZxid = 0x151
cversion = 0
dataVersion = 1
aclVersion = 0
ephemeralOwner = 0x0
dataLength = 23
numChildren = 0

查看结果:

1
2
3
4
5
6
7
8
9
10
11
12
13
[zk: localhost:2181(CONNECTED) 5] get /FirstZnode
myfirstzookeeper-app1.1
cZxid = 0x151
ctime = Thu May 04 17:02:34 CST 2017
mZxid = 0x15d
mtime = Thu May 04 17:46:18 CST 2017
pZxid = 0x151
cversion = 0
dataVersion = 1
aclVersion = 0
ephemeralOwner = 0x0
dataLength = 23
numChildren = 0

设置监听

当指定的znode或znode的子数据更改时,watch会显示通知。

语法

1
get /path [watch] 1

示例:

1
2
3
4
5
6
7
8
9
10
11
12
13
[zk: localhost:2181(CONNECTED) 6] get /FirstZnode 1
myfirstzookeeper-app1.1
cZxid = 0x151
ctime = Thu May 04 17:02:34 CST 2017
mZxid = 0x15d
mtime = Thu May 04 17:46:18 CST 2017
pZxid = 0x151
cversion = 0
dataVersion = 1
aclVersion = 0
ephemeralOwner = 0x0
dataLength = 23
numChildren = 0

设置了监听的节点被修改后,输出会稍微不同,带有watch信息

1
2
3
4
5
6
7
8
9
10
11
12
13
14
15
16
[zk: localhost:2181(CONNECTED) 7] set /FirstZnode "myfirstzookeeper-app1.2"
WATCHER::
cZxid = 0x151
WatchedEvent state:SyncConnected type:NodeDataChanged path:/FirstZnode
ctime = Thu May 04 17:02:34 CST 2017
mZxid = 0x15e
mtime = Thu May 04 17:52:14 CST 2017
pZxid = 0x151
cversion = 0
dataVersion = 2
aclVersion = 0
ephemeralOwner = 0x0
dataLength = 23
numChildren = 0

创建子节点

创建子节点类似于创建新的znode。唯一的区别是子节点znode的路径包含了父路径。

语法

1
create /parentpath/childpath data

示例:

1
2
3
4
[zk: localhost:2181(CONNECTED) 8] create /FirstZnode/Child1 "firstchildren"
Created /FirstZnode/Child1
[zk: localhost:2181(CONNECTED) 9] create /FirstZnode/Child2 "secondchildren"
Created /FirstZnode/Child2

查看子节点

查看znode所有的子节点。

语法

1
ls /path

示例:

1
2
[zk: localhost:2181(CONNECTED) 10] ls /FirstZnode
[Child2, Child1]

查看根目录下所有节点:

1
2
[zk: localhost:2181(CONNECTED) 11] ls /
[dubbo, FirstZnode0000000006, zookeeper, FirstZnode]

检查状态

查看指定znode的元数据。包含详细信息,如时间戳,版本号,ACL,数据长度和子节点znode。

语法

1
stat /path

示例:

1
2
3
4
5
6
7
8
9
10
11
12
[zk: localhost:2181(CONNECTED) 12] stat /FirstZnode
cZxid = 0x151
ctime = Thu May 04 17:02:34 CST 2017
mZxid = 0x15e
mtime = Thu May 04 17:52:14 CST 2017
pZxid = 0x160
cversion = 2
dataVersion = 2
aclVersion = 0
ephemeralOwner = 0x0
dataLength = 23
numChildren = 2

删除节点

删除指定的znode及其所有子节点。

语法

1
rmr /path

示例:

1
2
3
[zk: localhost:2181(CONNECTED) 13] rmr /FirstZnode
[zk: localhost:2181(CONNECTED) 14] get /FirstZnode
Node does not exist: /FirstZnode

还有一种删除,只能删除没有子节点的节点,语法:

1
delete /path

示例:

1
2
3
4
5
6
7
8
9
10
[zk: localhost:2181(CONNECTED) 17] create /myZnode "mydata"
Created /myZnode
[zk: localhost:2181(CONNECTED) 18] create /myZnode/child1 "child1data"
Created /myZnode/child1
[zk: localhost:2181(CONNECTED) 19] delete /myZnode
Node not empty: /myZnode
[zk: localhost:2181(CONNECTED) 20] delete /myZnode/child1
[zk: localhost:2181(CONNECTED) 21] delete /myZnode
[zk: localhost:2181(CONNECTED) 22] get /myZnode
Node does not exist: /myZnode

zookeeper 数据模型

简单使用了zookeeper之后,我们发现其数据模型有些像操作系统的文件结构,结构如下图所示
zookeeper数据模型

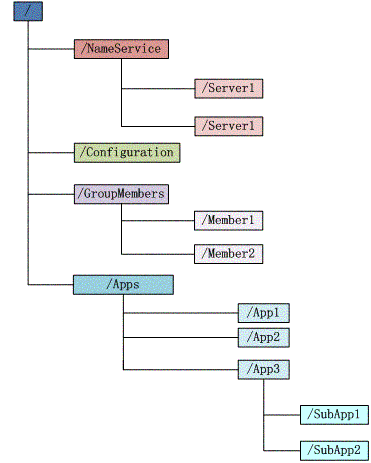
  1. 每个节点在zookeeper中叫做znode,并且其有一个唯一的路径标识,如/Server1节点的标识就为/NameService/Server1。
  2. znode可以有子znode,并且znode里可以存数据,但是EPHEMERAL类型的节点不能有子节点。
  3. znode中的数据可以有多个版本,比如某一个路径下存有多个数据版本,那么查询这个路径下的数据就需要带上版本。
  4. znode可以是临时节点,一旦创建这个znode的客户端与服务器失去联系,这个znode也将自动删除。zookeeper的客户端和服务器通信采用长连接方式,每个客户端和服务器通过心跳来保持连接,这个连接状态称为session,如果这个session失效,临时znode也就删除了。
  5. znode的目录名可以自动编号,如sznode0000000001已经存在,再创建sznode的话,将会自动命名为sznode0000000002。
  6. znode可以被监控,包括这个目录节点中存储的数据的修改,子节点目录的变化等,一旦变化可以通知设置监控的客户端,这个功能是zookeeper对于应用最重要的特性,通过这个特性可以实现的功能包括配置的集中管理,集群管理,分布式锁等等。

Zookeeper API

Znode是ZooKeeper核心组件,ZooKeeper API提供了方法来操纵znode。

客户端遵循以下步骤来与ZooKeeper进行清晰和干净的交互:

  • 连接到ZooKeeper服务。ZooKeeper服务为客户端分配会话ID。
  • 定期向服务器发送心跳。否则,ZooKeeper将设定会话ID过期,客户端需要重新连接。
  • 只要会话ID处于活动状态,就可以获取/设置znode。
  • 所有任务完成后,断开与ZooKeeper服务的连接。 如果客户端长时间不活动,则ZooKeeper服务将自动断开客户端。

示例:

1
2
3
4
5
6
7
8
9
10
11
12
13
14
15
16
17
18
19
20
21
22
23
24
25
26
27
28
29
30
31
32
33
34
35
36
37
38
39
40
41
42
43
44
45
46
47
48
49
50
51
52
53
54
55
56
57
58
59
60
61
62
63
64
65
66
67
68
69
70
71
72
73
74
75
76
77
import java.io.IOException;
import java.util.List;
import org.apache.zookeeper.CreateMode;
import org.apache.zookeeper.KeeperException;
import org.apache.zookeeper.WatchedEvent;
import org.apache.zookeeper.Watcher;
import org.apache.zookeeper.ZooDefs;
import org.apache.zookeeper.ZooKeeper;
import org.apache.zookeeper.data.Stat;
/**
* Test Zookeeper
*
* @author tenny.peng
*/
public class TestZookeeper {
public static void main(String[] args) {
try {
// 创建一个Zookeeper实例。param1:目标服务器地址和端口;param2:Session超时时间;param3:节点变化时的回调方法。
ZooKeeper zk = new ZooKeeper("127.0.0.1:2181", 500000, new Watcher() {
// 监控所有被触发的事件
public void process(WatchedEvent event) {
// dosomething
System.out.println("监听事件: " + event.toString());
}
});
// 创建一个节点。param1:节点路径;param2:节点数据;param3:权限控制;这里表示所有人都可以操作;param4:节点类型,这里为永久。
zk.create("/FirstZnode", "my first zookeeper app".getBytes(), ZooDefs.Ids.OPEN_ACL_UNSAFE, CreateMode.PERSISTENT);
// 查看一个节点是否存在。param1:znode路径;param2:是否监测(watch)查看的节点,重载方法:可传入自定义watch。
Stat stat = zk.exists("/FirstZnode", true);
System.out.println("version: " + stat.getVersion());
// 获取一个节点的数据。param1:znode路径;param2:是否监测(watch),重载方法:可传入自定义watch;param3:znode的元数据。
byte[] b = zk.getData("/FirstZnode", true, stat);
String data = new String(b);
System.out.println(data);
// 修改一个节点的数据。param1:znode路径;param2:节点数据;param3:znode当前的版本号,-1无视被修改的数据版本,直接改掉。每当数据更改时,ZooKeeper会更新znode的版本号。
zk.setData("/FirstZnode", "my first zookeeper app1.1".getBytes(), stat.getVersion());
stat = zk.exists("/FirstZnode", true);
System.out.println("version: " + stat.getVersion());
b = zk.getData("/FirstZnode", true, stat);
data = new String(b);
System.out.println(data);
// 创建子节点,和创建节点一样。
zk.create("/FirstZnode/child1", "child1 data".getBytes(), ZooDefs.Ids.OPEN_ACL_UNSAFE, CreateMode.PERSISTENT);
zk.create("/FirstZnode/child2", "child2 data".getBytes(), ZooDefs.Ids.OPEN_ACL_UNSAFE, CreateMode.PERSISTENT);
// 获取子节点。param1:znode路径;param2:是否监测(watch),重载方法:可传入自定义watch。
List<String> children = zk.getChildren("/FirstZnode", true);
for (int i = 0; i < children.size(); i++) {
System.out.println(children.get(i));
}
// 删除节点,如有子节点必须先删除子节点。param1:znode路径;param2:znode的当前版本,-1的话直接删除,无视版本。
zk.delete("/FirstZnode/child1", -1);
zk.delete("/FirstZnode/child2", -1);
zk.delete("/FirstZnode", -1);
// 关闭session
zk.close();
} catch (IOException e) {
e.printStackTrace();
} catch (KeeperException e) {
e.printStackTrace();
} catch (InterruptedException e) {
e.printStackTrace();
}
}
}

结果:

1
2
3
4
5
6
7
8
9
10
监听事件: WatchedEvent state:SyncConnected type:None path:null
version: 0
my first zookeeper app
监听事件: WatchedEvent state:SyncConnected type:NodeDataChanged path:/FirstZnode
version: 1
my first zookeeper app1.1
child2
child1
监听事件: WatchedEvent state:SyncConnected type:NodeChildrenChanged path:/FirstZnode
监听事件: WatchedEvent state:SyncConnected type:NodeDeleted path:/FirstZnode

zookeeper 集群

Zookeeper 不仅可以单机提供服务,同时也支持多机组成集群来提供服务。实际上 Zookeeper 还支持另外一种伪集群的方式,也就是可以在一台物理机上运行多个 Zookeeper 实例。

下面介绍伪集群模式的安装和配置:

  1. 新建一个总文件夹zookeeperCluster用于存放集群;
  2. zookeeperCluster文件夹下建立三个文件夹server1,server2,server3;
  3. 每个server里面新建一个data文件夹和一个log文件夹,并复制一份单机的zookeeper的文件夹;
  4. 每个server/data下新建一个myid文件并写入一个数字,server1就写1,server2写2,server3写3。Zookeeper 启动时会读取这个文件,拿到里面的数据与 zoo.cfg 里面的配置信息比较从而判断当前 server 到底是哪个 server。
  5. 进入各个server/zookeeper/conf目录,编辑zoo.cfg。由于是在一台机器上部署多个server,每个server要用不同的clientPort,比如server1是2181,server2是2182,server3是2183,dataDir和dataLogDir也要修改成相应路径。

    1
    2
    3
    4
    5
    6
    7
    8
    9
    tickTime=2000
    initLimit=10
    syncLimit=4
    dataDir=D:/devsoft/zookeeperCluster/server1/data
    dataLogDir=D:/devsoft/zookeeperCluster/server1/log
    clientPort=2181
    server.1=127.0.0.1:2888:3888
    server.2=127.0.0.1:2889:3889
    server.3=127.0.0.1:2890:3890
  6. 分别启动三个server/zookeeper/bin/zkServer.cmd。

说明一下集群的几个配置参数

  • initLimit:这个配置项是用来配置 Zookeeper 接受客户端(这里所说的客户端不是用户连接 Zookeeper 服务器的客户端,而是 Zookeeper 服务器集群中连接到 Leader 的 Follower 服务器)初始化连接时最长能忍受多少个心跳时间间隔数。当已经超过 10 个心跳的时间(也就是 tickTime)长度后 Zookeeper 服务器还没有收到客户端的返回信息,那么表明这个客户端连接失败。总的时间长度就是 10*2000=20 秒。
  • syncLimit:这个配置项标识 Leader 与 Follower 之间发送消息,请求和应答时间长度,最长不能超过多少个 tickTime 的时间长度,总的时间长度就是 4*2000=8 秒。
  • server.A=B:C:D:其中 A 是一个数字,表示这个是第几号服务器;B 是这个服务器的 ip 地址;C 表示的是这个服务器与集群中的 Leader 服务器交换信息的端口;D 表示的是万一集群中的 Leader 服务器挂了,需要一个端口来重新进行选举,选出一个新的 Leader,而这个端口就是用来执行选举时服务器相互通信的端口。如果是伪集群的配置方式,由于 B 都是一样,所以不同的 Zookeeper 实例通信端口号不能一样,所以要给它们分配不同的端口号。

启动第一个server,这时会报大量错误。

1
2
2017-05-06 17:26:12,366 [myid:1] - INFO [QuorumPeer[myid=1]/0:0:0:0:0:0:0:0:218
1:FastLeaderElection@852] - Notification time out: 800

没关系,因为现在集群只起了1台server,zookeeper服务器端起来会根据zoo.cfg的服务器列表发起选举leader的请求,因为连不上其他机器而报错。
我们再起第二个zookeeper服务,leader将会被选出,从而一致性服务开始可以使用,这是因为3台机器只要有2台可用就可以选出leader并且对外提供服务(2n+1台机器,可以容n台机器挂掉)。

1
2
2017-05-06 17:26:39,573 [myid:2] - INFO [WorkerSender[myid=2]:QuorumPeer$Quorum
Server@149] - Resolved hostname: 127.0.0.1 to address: /127.0.0.1

再启动最后一个zookeeper服务。

1
2
3
2017-05-06 17:27:11,071 [myid:3] - INFO [QuorumPeer[myid=3]/0:0:0:0:0:0:0:0:218
3:FileTxnSnapLog@240] - Snapshotting: 0x700000000 to D:\devsoft\zookeeperCluster
\server3\data\version-2\snapshot.700000000

开启一个客户端zkCli.cmd,可以看到成功连接集群中的master。

1
2
3
2017-05-06 17:27:11,071 [myid:3] - INFO [QuorumPeer[myid=3]/0:0:0:0:0:0:0:0:218
3:FileTxnSnapLog@240] - Snapshotting: 0x700000000 to D:\devsoft\zookeeperCluster
\server3\data\version-2\snapshot.700000000

然后客户端就可以像之前单机一样进行各种操作。

1
2
3
4
5
6
7
8
9
ls /
[zookeeper]
[zk: localhost:2181(CONNECTED) 1] create /testZnode "testdata"
Created /testZnode
[zk: localhost:2181(CONNECTED) 2] ls /
[zookeeper, testZnode]
[zk: localhost:2181(CONNECTED) 3] delete /testZnode
[zk: localhost:2181(CONNECTED) 4] ls /
[zookeeper]

ZooKeeper 典型的应用场景

Zookeeper 从设计模式角度来看,是一个基于观察者模式设计的分布式服务管理框架,它负责存储和管理大家都关心的数据,然后接受观察者的注册,一旦这些数据的状态发生变化,Zookeeper 就将负责通知已经在 Zookeeper 上注册的那些观察者做出相应的反应,从而实现集群中类似 Master/Slave 管理模式。

下面详细介绍这些典型的应用场景。

配置管理(Configuration Management)

配置的管理在分布式应用环境中很常见,例如同一个应用系统需要多台 PC Server 运行,但是它们运行的应用系统的某些配置项是相同的,如果要修改这些相同的配置项,那么就必须同时修改每台运行这个应用系统的 PC Server,这样非常麻烦而且容易出错。

像这样的配置信息完全可以交给 Zookeeper 来管理,将配置信息保存在 Zookeeper 的某个目录节点中,然后将所有需要修改的应用机器监控配置信息的状态,一旦配置信息发生变化,每台应用机器就会收到 Zookeeper 的通知,然后从 Zookeeper 获取新的配置信息应用到系统中。

比如将APP1的所有配置配置到/APP1 znode下,APP1所有机器一启动就对/APP1这个节点进行监控,并且实现回调方法Watcher,那么在zookeeper上/APP1 znode节点下数据发生变化的时候,每个机器都会收到通知,Watcher方法将会被执行,那么应用再取下数据即可。
配置管理结构图

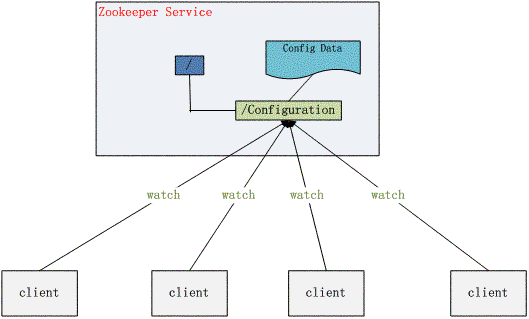
集群管理(Group Membership)

Zookeeper 能够很容易的实现集群管理的功能,如有多台 Server 组成一个服务集群,那么必须要一个“总管”知道当前集群中每台机器的服务状态,一旦有机器不能提供服务,集群中其它集群必须知道,从而做出调整重新分配服务策略。同样当增加集群的服务能力时,就会增加一台或多台 Server,同样也必须让“总管”知道。

Zookeeper 不仅能够帮你维护当前的集群中机器的服务状态,而且能够帮你选出一个“总管”,让这个总管来管理集群,这就是 Zookeeper 的另一个功能 Leader Election。

它们的实现方式都是在 Zookeeper 上创建一个 EPHEMERAL 类型的目录节点,然后每个 Server 在它们创建目录节点的父目录节点上调用 getChildren(String path, boolean watch) 方法并设置 watch 为 true,由于是 EPHEMERAL 目录节点,当创建它的 Server 死去,这个目录节点也随之被删除,所以 Children 将会变化,这时 getChildren上的 Watch 将会被调用,所以其它 Server 就知道已经有某台 Server 死去了。新增 Server 也是同样的原理。

Zookeeper 如何实现 Leader Election,也就是选出一个 Master Server。和前面的一样每台 Server 创建一个 EPHEMERAL 目录节点,不同的是它还是一个 SEQUENTIAL 目录节点,所以它是个 EPHEMERAL_SEQUENTIAL 目录节点。之所以它是 EPHEMERAL_SEQUENTIAL 目录节点,是因为我们可以给每台 Server 编号,我们可以选择当前是最小编号的 Server 为 Master,假如这个最小编号的 Server 死去,由于是 EPHEMERAL 节点,死去的 Server 对应的节点也被删除,所以当前的节点列表中又出现一个最小编号的节点,我们就选择这个节点为当前 Master。这样就实现了动态选择 Master,避免了传统意义上单 Master 容易出现单点故障的问题。
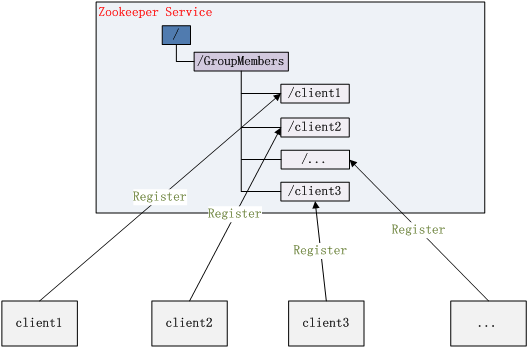
集群管理结构图

总结

通过命令行和API使用了zookeeper的基本功能。Zoopkeeper 提供了一套很好的分布式集群管理的机制,即基于层次型的目录树的数据结构,并对树中的节点进行有效管理,从而可以设计出多种多样的分布式的数据管理模型。

参考链接:http://www.w3cschool.cn/zookeeper/
     http://www.blogjava.net/BucketLi/archive/2010/12/21/341268.html
     https://www.ibm.com/developerworks/cn/opensource/os-cn-zookeeper/

spring整合dubbo(zookeeper)

发表于 2017-05-04 | 分类于 dubbo

dubbo是什么

Dubbo是阿里巴巴公司开源的一个高性能优秀的分布式服务框架,致力于提供高性能和透明化的RPC远程服务调用方案,以及SOA服务治理方案。可以和Spring框架无缝集成。

主要核心部件

  • 远程通讯:提供对多种基于长连接的NIO框架抽象封装,包括多种线程模型,序列化,以及“请求-响应”模式的信息交换方式。
  • 集群容错:提供基于接口方法的透明远程过程调用,包括多协议支持,以及软负载均衡,失败容错,地址路由,动态配置等集群支持。
  • 自动发现:基于注册中心目录服务,使服务消费方能动态的查找服务提供方,使地址透明,使服务提供方可以平滑增加或减少机器。

dubbo能做什么

  • 透明化的远程方法调用,就像调用本地方法一样调用远程方法,只需简单配置,没有任何API侵入。
  • 软负载均衡及容错机制,可在内网替代F5等硬件负载均衡器,降低成本,减少单点。
  • 服务自动注册与发现,不再需要写死服务提供方地址,注册中心基于接口名查询服务提供者的IP地址,并且能够平滑添加或删除服务提供者。

dubbo的架构

dubbo架构图

节点角色说明:

  • Provider:暴露服务方称之为“服务提供者”。
  • Consumer:调用远程服务方称之为“服务消费者”。
  • Registry:服务注册与发现的中心目录服务称之为“服务注册中心”。
  • Monitor:统计服务的调用次数和调用时间的日志服务称之为“服务监控中心”。
  • Container:服务运行容器。

调用关系说明:

  1. 服务容器负责启动,加载,运行服务提供者。

  2. 服务提供者在启动时,向注册中心注册自己提供的服务。

  3. 服务消费者在启动时,向注册中心订阅自己所需的服务。

  4. 注册中心返回服务提供者地址列表给消费者,如果有变更,注册中心将基于长连接推送变更数据给消费者。

  5. 服务消费者,从提供者地址列表中,基于软负载均衡算法,选一台提供者进行调用,如果调用失败,再选另一台调用。

  6. 服务消费者和提供者,在内存中累计调用次数和调用时间,定时每分钟发送一次统计数据到监控中心。

spring集成使用

Dubbo采用全Spring配置方式,透明化接入应用,对应用没有任何API侵入,只需用Spring加载Dubbo的配置即可,Dubbo基于Spring的Schema扩展进行加载。

下载zookeeper

zookeeper是一个分布式服务框架,本例使用zookeeper管理dubbo服务。下载地址:http://www.apache.org/dyn/closer.cgi/zookeeper/ 下载后解压即可,进
入zookeeper根目录下的bin目录,如D:\devsoft\zookeeper-3.4.8\bin,双击zkServer.cmd启动注册中心服务。

服务提供者

新建一个maven工程,作为服务提供方。

pom.xml

除了基本的spring等依赖,额外添加dubbo和zkclient依赖:

1
2
3
4
5
6
7
8
9
10
11
12
13
<!-- spring dubbo 整合 -->
<dependency>
<groupId>com.alibaba</groupId>
<artifactId>dubbo</artifactId>
<version>2.5.3</version>
</dependency>
<!-- dubbo注册在zookeeper上,必须引用zkclient -->
<dependency>
<groupId>com.github.sgroschupf</groupId>
<artifactId>zkclient</artifactId>
<version>0.1</version>
</dependency>

spring-dubbo.xml

1
2
3
4
5
6
7
8
9
10
11
12
13
14
15
16
17
18
19
20
21
22
23
24
25
<?xml version="1.0" encoding="UTF-8"?>
<beans xmlns="http://www.springframework.org/schema/beans"
xmlns:xsi="http://www.w3.org/2001/XMLSchema-instance"
xmlns:dubbo="http://code.alibabatech.com/schema/dubbo"
xsi:schemaLocation="http://www.springframework.org/schema/beans
http://www.springframework.org/schema/beans/spring-beans.xsd
http://code.alibabatech.com/schema/dubbo
http://code.alibabatech.com/schema/dubbo/dubbo.xsd">
<!-- 提供方应用信息,用于计算依赖关系 -->
<dubbo:application name="dubbo_service_provider" />
<!--使用zookeeper注册中心暴露和发现服务地址 -->
<dubbo:registry address="zookeeper://127.0.0.1:2181" />
<!-- 用dubbo协议在20880端口暴露服务 -->
<dubbo:protocol name="dubbo" port="20880" />
<!-- 声明需要暴露的服务接口 -->
<dubbo:service interface="com.news.service.IDubboService" ref="dubboService" />
<!-- 具体的实现bean -->
<bean id="dubboService" class="com.news.service.impl.DubboServiceImpl" />
</beans>

IDubboService & DubboServiceImpl

1
2
3
4
5
6
7
8
9
10
package com.news.service;
/**
* TODO
*
* @author tenny.peng
*/
public interface IDubboService {
public void sayHello(String name);
}
1
2
3
4
5
6
7
8
9
10
11
12
13
14
15
16
17
package com.news.service.impl;
import com.news.service.IDubboService;
/**
* TODO
*
* @author tenny.peng
*/
public class DubboServiceImpl implements IDubboService {
@Override
public void sayHello(String name) {
System.out.println("hello: " + name);
}
}

TestDubbo.java

1
2
3
4
5
6
7
8
9
10
11
12
13
14
15
16
17
18
19
20
package news;
import java.io.IOException;
import org.springframework.context.support.ClassPathXmlApplicationContext;
/**
* TODO
*
* @author tenny.peng
*/
public class TestDubbo {
public static void main(String[] args) throws IOException {
ClassPathXmlApplicationContext context = new ClassPathXmlApplicationContext("dubbo/spring-dubbo.xml");
System.in.read(); // 为保证服务一直开着,利用输入流的阻塞来模拟
}
}

运行TestDubbo.java,我们的服务提供方就完成了。

服务消费者

再新建一个maven工程,作为服务消费者。

pom.xml

消费者引入之前服务提供者的服务(这里引用了整个项目,实际中项目会分层,只需引用对应的service层即可)。

1
2
3
4
5
<dependency>
<groupId>org.news</groupId>
<artifactId>news</artifactId>
<version>${news.version}</version>
</dependency>

服务提供者对应的工程信息:

1
2
3
4
<groupId>org.news</groupId>
<artifactId>news</artifactId>
<packaging>war</packaging>
<version>0.0.1</version>

spring-dubbo.xml

1
2
3
4
5
6
7
8
9
10
11
12
13
14
15
16
17
18
19
<?xml version="1.0" encoding="UTF-8"?>
<beans xmlns="http://www.springframework.org/schema/beans"
xmlns:xsi="http://www.w3.org/2001/XMLSchema-instance"
xmlns:dubbo="http://code.alibabatech.com/schema/dubbo"
xsi:schemaLocation="http://www.springframework.org/schema/beans
http://www.springframework.org/schema/beans/spring-beans.xsd
http://code.alibabatech.com/schema/dubbo
http://code.alibabatech.com/schema/dubbo/dubbo.xsd">
<!-- 消费方应用名,用于计算依赖关系,不是匹配条件,不要与提供方一样 -->
<dubbo:application name="dubbo_service_consumer" />
<!--使用zookeeper注册中心暴露和发现服务地址 -->
<dubbo:registry protocol="zookeeper" address="127.0.0.1:2181" />
<!-- 生成远程服务代理,可以像使用本地bean一样使用userService -->
<dubbo:reference id="dubboService" interface="com.news.service.IDubboService"/>
</beans>

这里的”dubbo:application name”虽然说名字不要一样,实际测试一样也没啥问题。。。

TestDubbo.java

1
2
3
4
5
6
7
8
9
10
11
12
13
14
15
16
17
18
19
20
21
22
package test;
import java.io.IOException;
import org.springframework.context.support.ClassPathXmlApplicationContext;
import com.news.service.IDubboService;
/**
* TODO
*
* @author tenny.peng
*/
public class TestDubbo {
public static void main(String[] args) throws IOException {
ClassPathXmlApplicationContext context = new ClassPathXmlApplicationContext("spring-dubbo.xml");
IDubboService dubboService = (IDubboService) context.getBean("dubboService");
dubboService.sayHello("dubbo");
}
}

运行TestDubbo.java,可以发现服务提供方的控制台输出

1
hello: dubbo

说明服务已经被调用成功了。

dubbo管理页面

网上搜索dubbo控制台页面,下载dubbo-admin.war。
自己下载的地址:http://www.pc6.com/softview/SoftView_468561.html

使用方法

先把tomcat下的webapps\ROOT目录下内容清空,将war包解压,解压的内容放进ROOT目录下。进入tomcat下的bin目录,运行startup.bat。

运行如果出现类似如下错误

1
Caused by: org.springframework.beans.NotWritablePropertyException: Invalid property 'URIType' of bean class [com.alibaba.citrus.service.uribroker.uri.GenericURIBroker]: Bean property 'URIType' is not writable or has an invalid setter method. Does the parameter type of the setter match the return type of the getter?

因为使用的jdk版本为1.8,不支持dubbo-admin中编写的方法。参考:http://blog.csdn.net/liutengteng130/article/details/47112683

解决办法可以降低jdk版本到1.7,但是项目都用了1.8,不想单独为它改环境变量。另一个办法是:
找到tomcat/bin目录中的setclasspath.bat,修改setclasspath.bat文件:

1
2
3
4
5
6
7
8
9
10
if ""%1"" == ""debug"" goto needJavaHome
set JAVA_HOME=D:\devsoft\Java\jdk1.7.0_71
rem Otherwise either JRE or JDK are fine
if not "%JRE_HOME%" == "" goto gotJreHome
if not "%JAVA_HOME%" == "" goto gotJavaHome
echo Neither the JAVA_HOME nor the JRE_HOME environment variable is defined
echo At least one of these environment variable is needed to run this program
goto exit

在合适位置加上这一行:set JAVA_HOME=D:\devsoft\Java\jdk1.7.0_71

查看页面

启动成功后,浏览器输入http://localhost:8080/ 就可以访问了。

第一次进入要求输入账号密码,默认root/root。

  • 管理页面
    管理页面

  • 应用页面
    应用页面

  • 提供者页面
    提供者页面

  • 消费者页面
    消费者页面

  • 服务页面
    服务页面

参考博客:http://www.cnblogs.com/Javame/p/3632473.html

spring加载多个xml遇到的问题

发表于 2017-04-27 | 分类于 spring

问题出现

之前学习spring整合redis,spring整合activemq,单独测试没有问题。后来想把他们一起部署启动,结果报错

1
Could not resolve placeholder 'redis.maxTotal' in string value "${redis.maxTotal}"

查找原因

查了一会找到了原因。因为我的spring-redis.xml和spring-activemq.xml都写了一个

1
<context:property-placeholder location="classpath:conf/xxx.properties" />

而Spring容器采用反射扫描的发现机制,在探测到Spring容器中有一个org.springframework.beans.factory.config.PropertyPlaceholderConfigurer的Bean就会停止对剩余PropertyPlaceholderConfigurer的扫描。

而这个基于命名空间的配置,其实内部就是创建一个PropertyPlaceholderConfigurer Bean而已。换句话说,即Spring容器仅允许最多定义一个PropertyPlaceholderConfigurer(或),其余的会被Spring忽略掉(其实Spring如果提供一个警告就好了)。

这样的话,其实就只加载了第一个properties文件,后面的并没有加载,自然也就找不到’redis.maxTotal’了。

尝试解决

按照网上的办法,去掉每个xml单独的context:property-placeholder,再写一个xml文件一次性加载所有资源文件,并引入之前单独的所有xml文件。

先将web文件的

1
2
3
4
5
6
7
context-param>
<param-name>contextConfigLocation</param-name>
<param-value>
classpath:spring-activemq.xml,
classpath:spring-redis.xml
</param-value>
</context-param>

改为

1
2
3
4
5
6
context-param>
<param-name>contextConfigLocation</param-name>
<param-value>
classpath:applicationContext.xml
</param-value>
</context-param>

编写这个applicationContext.xml如下:

1
2
3
4
5
6
7
8
9
10
11
12
13
14
15
16
17
<?xml version="1.0" encoding="UTF-8"?>
<beans xmlns="http://www.springframework.org/schema/beans"
xmlns:xsi="http://www.w3.org/2001/XMLSchema-instance"
xmlns:context="http://www.springframework.org/schema/context"
xmlns:p="http://www.springframework.org/schema/p"
xsi:schemaLocation="http://www.springframework.org/schema/beans
http://www.springframework.org/schema/beans/spring-beans-3.0.xsd
http://www.springframework.org/schema/context
http://www.springframework.org/schema/context/spring-context.xsd">
<context:property-placeholder location="classpath:conf/*.properties" />
<import resource="activemq/spring-activemq.xml" />
<import resource="redis/spring-redis.xml" />
</beans>

这样部署启动应该就可以了。

新的问题

按道理应该启动成功,不过我这里又遇到另一个问题

1
Cannot convert value of type [org.springframework.data.redis.connection.jedis.JedisConnectionFactory] to required type [javax.jms.ConnectionFactory] for property 'connectionFactory': no matching editors or conversion strategy found

再查原因

查看自己的spring-redis.xml

1
2
3
4
5
6
7
8
<bean id="connectionFactory" class="org.springframework.data.redis.connection.jedis.JedisConnectionFactory"
p:hostName="${redis.host}" p:port="${redis.port}" p:password="${redis.pass}" c:poolConfig-ref="poolConfig">
</bean>
<bean id="redisTemplate" class="org.springframework.data.redis.core.RedisTemplate">
<property name="connectionFactory" ref="connectionFactory" />
<property name="keySerializer" ref="keySerializer" />
</bean>

并没有需要’javax.jms.ConnectionFactory’,根据问题在网上搜索,在一篇博客看到了’redis也有个bean叫connectionFactory’的字眼。于是想到自己应该也是bean name重复了。查看spring-activemq.xml

1
2
3
4
5
6
7
8
9
<bean id="connectionFactory" class="org.springframework.jms.connection.SingleConnectionFactory">
<property name="targetConnectionFactory" ref="pooledConnectionFactory"/>
</bean>
<!-- Spring提供的JMS工具类,它可以进行消息发送、接收等 -->
<bean id="jmsTemplate" class="org.springframework.jms.core.JmsTemplate">
<property name="connectionFactory" ref="connectionFactory"/>
<property name="defaultDestinationName" value="${activemq.queue.name}"/>
</bean>

解决问题

问题就很明显了,spring-redis.xml和spring-activemq.xml都有connectionFactory这个bean。于是修改了spring-redis.xml中的bean name

1
2
3
4
5
6
7
8
<bean id="redisConnectionFactory" class="org.springframework.data.redis.connection.jedis.JedisConnectionFactory"
p:hostName="${redis.host}" p:port="${redis.port}" p:password="${redis.pass}" c:poolConfig-ref="poolConfig">
</bean>
<bean id="redisTemplate" class="org.springframework.data.redis.core.RedisTemplate">
<property name="connectionFactory" ref="redisConnectionFactory" />
<property name="keySerializer" ref="keySerializer" />
</bean>

再次部署启动,OK。

参考博客:http://www.iteye.com/topic/1131688
     http://blog.csdn.net/AlbertFly/article/details/51503079

spring的MessageSource

发表于 2017-04-25 | 分类于 MessageSource

spring-message.xml

配置messageSource路径。

1
2
3
4
5
6
7
8
9
10
11
12
13
<bean id="messageSource"
class="org.springframework.context.support.ReloadableResourceBundleMessageSource">
<property name="basenames">
<list>
<value>classpath:message/message</value>
</list>
</property>
<property name="defaultEncoding" value="UTF-8"/>
</bean>
<bean id="messageHelper" class="com.news.common.utils.MessageHelper">
<property name="messageSource" ref="messageSource"/>
</bean>

MessageHelper

信息工具类,通过spring注入。核心是上面配置的messageSource,可针对不同地区/国家加载不同的信息文件(message.properties)。

1
2
3
4
5
6
7
8
9
10
11
12
13
14
15
16
17
18
19
20
21
22
23
24
25
import java.util.Locale;
import org.springframework.context.MessageSource;
public class MessageHelper {
private static MessageSource messageSource;
public static void setMessageSource(MessageSource messageSource) {
MessageHelper.messageSource = messageSource;
}
public static String getMessage(String code) {
return getMessage(code, null);
}
public static String getMessage(String code, Object[] args) {
return messageSource.getMessage(code, args, Locale.getDefault());
}
public static String getMessage(String code, Object[] args, Locale locale) {
return messageSource.getMessage(code, args, locale);
}
}

message_zh_CN.properties & message_en_US.properties

message_zh_CN,针对中文语言环境。

1
2
3
4
#用户提示
u0001=用户名或密码不能为空!
u0002=用户名"{0}"已存在!
u0003=用户名或密码错误!

message_en_US.properties,针对英文(国际)语言环境。

1
2
3
4
#user tips
u0001=username or password cannot be null!
u0002=username "{0}" is already exist!
u0003=username or password is error!

TestMeaage.java

使用默认本地语言环境(中文)和指定语言环境(英文)分别测试。

1
2
3
4
5
6
7
8
9
10
11
12
13
14
15
16
17
18
19
20
21
22
23
24
25
26
import java.util.Locale;
import org.springframework.context.support.ClassPathXmlApplicationContext;
import com.news.common.utils.MessageHelper;
/**
* TODO
*
* @author tenny.peng
*/
public class TestMessage {
public static void main(String[] args) {
ClassPathXmlApplicationContext context = new ClassPathXmlApplicationContext("spring-message.xml");
System.out.println(MessageHelper.getMessage("u0001"));
System.out.println(MessageHelper.getMessage("u0002", new String[] { "tenny" }));
System.out.println(MessageHelper.getMessage("u0003"));
System.out.println(MessageHelper.getMessage("u0001", null, Locale.US));
System.out.println(MessageHelper.getMessage("u0002", new String[] { "tenny" }, Locale.US));
System.out.println(MessageHelper.getMessage("u0003", null, Locale.US));
}
}

输出

1
2
3
4
5
6
用户名或密码不能为空!
用户名"tenny"已存在!
用户名或密码错误!
username or password cannot be null!
username "tenny" is already exist!
username or password is error!

方法说明

messageSource.getMessage(code, args, locale)有三个参数:

  1. 消息的编码值;

  2. 对应消息的参数,没有就传null;

  3. java.util.Locale参数。locale为null时,根据使用者的语言环境决定Locale,从而决定要加载的message文件。
    上面的测试先后加载了messages_zh_CN.properties和message_en_US.properties资源文件。
    这其中还有一个控制点在JVM,JVM会根据当前操作系统的语言环境进行相应处理,我们可以通过在JVM启动参数中追加“-Duser.lang ge=zh_TW”来设定当前JVM语言类型,通过JVM级的设定,也可以实现自动切换所使用的资源文件类型。
    所以这里面的控制语言的方式有三种:从最低层的操作系统的Locale设定,到更上一层的JVM的Locale设定,再到程序一级的Locale设定。

参考博客:http://lixiaorong223.blog.163.com/blog/static/4401162920110106305224/

spring整合activemq

发表于 2017-04-24 | 分类于 activemq

1.安装activemq

到http://activemq.apache.org/ 下载最新版。我这里下载的是Windows版。

下载完成之后解压缩,运行bin目录下的activemq.bat,看到类似如下信息说明启动成功。

1
2
3
4
5
6
7
8
9
10
11
12
13
14
15
16
17
18
19
20
21
22
23
24
25
26
27
28
29
30
31
32
33
34
35
ACTIVEMQ_HOME: D:\devsoft\apache-activemq-5.1.0\bin\..
ACTIVEMQ_BASE: D:\devsoft\apache-activemq-5.1.0\bin\..
Loading message broker from: xbean:activemq.xml
INFO BrokerService - Using Persistence Adapter: AMQPersistenceAdapter(D:\devsoft\apache-activemq-5.1.0\bin\..\data)
INFO BrokerService - ActiveMQ 5.1.0 JMS Message Broker (localhost) is starting
INFO BrokerService - For help or more information please see: http://activemq.apache.org/
INFO AMQPersistenceAdapter - AMQStore starting using directory: D:\devsoft\apache-activemq-5.1.0\bin\..\data
INFO KahaStore - Kaha Store using data directory D:\devsoft\apache-activemq-5.1.0\bin\..\data\kr-store\state
INFO AMQPersistenceAdapter - Active data files: []
WARN AMQPersistenceAdapter - The ReferenceStore is not valid - recovering ...
INFO KahaStore - Kaha Store successfully deleted data directory D:\devsoft\apache-activemq-5.1.0\bin\..\data\kr-store\data
INFO AMQPersistenceAdapter - Journal Recovery Started from: DataManager:(data-)
INFO KahaStore - Kaha Store using data directory D:\devsoft\apache-activemq-5.1.0\bin\..\data\kr-store\data
INFO AMQPersistenceAdapter - Recovered 3611 operations from redo log in 0.85 seconds.
INFO AMQPersistenceAdapter - Finished recovering the ReferenceStore
INFO TransportServerThreadSupport - Listening for connections at: tcp://Lenovo-PC:61616
INFO TransportConnector - Connector openwire Started
INFO TransportServerThreadSupport - Listening for connections at: ssl://Lenovo-PC:61617
INFO TransportConnector - Connector ssl Started
INFO TransportServerThreadSupport - Listening for connections at: stomp://Lenovo-PC:61613
INFO TransportConnector - Connector stomp Started
INFO TransportServerThreadSupport - Listening for connections at: xmpp://Lenovo-PC:61222
INFO TransportConnector - Connector xmpp Started
INFO NetworkConnector - Network Connector default-nc Started
INFO BrokerService - ActiveMQ JMS Message Broker (localhost, ID:Lenovo-PC-51314-1493018577517-0:0) started
INFO log - Logging to org.slf4j.impl.JCLLoggerAdapter(org.mortbay.log) via org.mortbay.log.Slf4jLog
INFO log - jetty-6.1.9
INFO WebConsoleStarter - ActiveMQ WebConsole initialized.
INFO /admin - Initializing Spring FrameworkServlet 'dispatcher'
INFO log - ActiveMQ Console at http://0.0.0.0:8161/admin
INFO log - ActiveMQ Web Demos at http://0.0.0.0:8161/demo
INFO log - RESTful file access application at http://0.0.0.0:8161/fileserver
INFO log - Started SelectChannelConnector@0.0.0.0:8161
INFO FailoverTransport - Successfully connected to tcp://localhost:61616
INFO TransportConnector - Connector vm://localhost Started

浏览器输入http://localhost:8161/admin/ 可查看本地activemq运行状态。
activemq主页

点击”Queues”可查看队列情况。现在没有信息,后面测试的时候会有信息。
activemq空queues

2.Maven添加依赖

1
2
3
4
5
6
7
8
9
10
11
12
13
14
15
<dependency>
<groupId>org.springframework</groupId>
<artifactId>spring-jms</artifactId>
<version>${spring.version}</version>
</dependency>
<dependency>
<groupId>org.apache.activemq</groupId>
<artifactId>activemq-core</artifactId>
<version>5.7.0</version>
</dependency>
<dependency>
<groupId>org.apache.activemq</groupId>
<artifactId>activemq-pool</artifactId>
<version>5.7.0</version>
</dependency>

3.activemp.properties属性文件

1
2
3
4
5
6
7
8
# 服务器地址
activemq.brokerURL=tcp://localhost:61616
# 连接池的最大连接数
activemq.maxConnections=10
# 目的队列的名称
activemq.queue.name=tenny:test

4.spring-activemq.xml配置文件

1
2
3
4
5
6
7
8
9
10
11
12
13
14
15
16
17
18
19
20
21
22
23
24
25
26
27
28
29
30
31
32
33
34
35
36
37
38
39
40
41
42
43
44
45
46
47
48
49
50
51
52
53
54
55
<?xml version="1.0" encoding="UTF-8"?>
<beans xmlns="http://www.springframework.org/schema/beans"
xmlns:xsi="http://www.w3.org/2001/XMLSchema-instance"
xmlns:context="http://www.springframework.org/schema/context"
xmlns:jms="http://www.springframework.org/schema/jms"
xsi:schemaLocation="http://www.springframework.org/schema/beans
http://www.springframework.org/schema/beans/spring-beans.xsd
http://www.springframework.org/schema/context
http://www.springframework.org/schema/context/spring-context.xsd
http://www.springframework.org/schema/beans
http://www.springframework.org/schema/beans/spring-beans.xsd
http://www.springframework.org/schema/jms
http://www.springframework.org/schema/jms/spring-jms.xsd">
<context:property-placeholder location="classpath:activemq.properties" />
<!-- 真正可以产生Connection的ConnectionFactory,由对应的 JMS服务厂商提供-->
<bean id="targetConnectionFactory" class="org.apache.activemq.ActiveMQConnectionFactory">
<property name="brokerURL" value="${activemq.brokerURL}"/>
</bean>
<bean id="pooledConnectionFactory" class="org.apache.activemq.pool.PooledConnectionFactory" destroy-method="stop">
<property name="connectionFactory" ref="targetConnectionFactory"/>
<property name="maxConnections" value="${activemq.maxConnections}"/>
</bean>
<bean id="connectionFactory" class="org.springframework.jms.connection.SingleConnectionFactory">
<property name="targetConnectionFactory" ref="pooledConnectionFactory"/>
</bean>
<!-- Spring提供的JMS工具类,它可以进行消息发送、接收等 -->
<bean id="jmsTemplate" class="org.springframework.jms.core.JmsTemplate">
<property name="connectionFactory" ref="connectionFactory"/>
<property name="defaultDestinationName" value="${activemq.queue.name}"/>
</bean>
<!--队列目的地,点对点模式-->
<bean id="queueDestination" class="org.apache.activemq.command.ActiveMQQueue">
<constructor-arg>
<value>
${activemq.queue.name}
</value>
</constructor-arg>
</bean>
<!-- 消息监听器 -->
<bean id="activeMQMessageListener" class="com.news.common.activemq.ActiveMQMessageListener" />
<!-- 消息监听容器 -->
<bean id="jmsContainer" class="org.springframework.jms.listener.DefaultMessageListenerContainer">
<property name="connectionFactory" ref="connectionFactory" />
<property name="destination" ref="queueDestination" />
<property name="messageListener" ref="activeMQMessageListener" />
</bean>
</beans>

其中的ActiveMQMessageListener

1
2
3
4
5
6
7
8
9
10
11
12
13
14
15
16
17
18
19
20
21
22
23
24
25
26
package com.news.common.activemq;
import javax.jms.JMSException;
import javax.jms.Message;
import javax.jms.MessageListener;
import javax.jms.TextMessage;
/**
*
* activemq消息监听
*
* @author Tenny.Peng
*/
public class ActiveMQMessageListener implements MessageListener {
@Override
public void onMessage(Message message) {
TextMessage textMsg = (TextMessage) message;
try {
// 处理消息
System.out.println("receive message from " + textMsg.getJMSDestination() + ": " + textMsg.getText());
} catch (JMSException e) {
e.printStackTrace();
}
}
}

5.测试类TestActivemq.java

1
2
3
4
5
6
7
8
9
10
11
12
13
14
15
16
17
18
19
20
21
22
23
24
25
26
27
28
29
30
31
32
33
34
package news;
import javax.jms.JMSException;
import javax.jms.Message;
import javax.jms.Session;
import org.springframework.context.support.ClassPathXmlApplicationContext;
import org.springframework.jms.core.JmsTemplate;
import org.springframework.jms.core.MessageCreator;
/**
* TODO
*
* @author tenny.peng
*/
public class TestActivemq {
public static void main(String[] args) {
@SuppressWarnings("resource")
ClassPathXmlApplicationContext context = new ClassPathXmlApplicationContext("spring-activemq.xml");
JmsTemplate jmsTemplate = (JmsTemplate) context.getBean("jmsTemplate");
final String destinationName = jmsTemplate.getDefaultDestinationName();
jmsTemplate.send(destinationName, new MessageCreator() {
@Override
public Message createMessage(Session session) throws JMSException {
// 消息对象
String message = "some information...";
return session.createTextMessage(message);
}
});
}
}

6.测试

运行一次TestActivemq.java,控制台输出如下,监听器已收到消息。

1
receive message from queue://tenny:test: some information...

查看Queues界面。没有待处理消息,有1个消费者,已发送/接收了1条信息。
Queues一条消息

之前的控制台不要关,再运行一次TestActivemq.java,之前的控制台输出如下

1
receive message from queue://tenny:test: some information...

说明之前的监听器又收到了消息。

再查看Queues界面。有2个消费者,已发送/接收了2条消息。
Queues两条消息

还是不关控制台,修改TestActivemq.java中发送消息的destinationName

1
jmsTemplate.send("panda", new MessageCreator()

再运行TestActivemq.java,控制台没有任何输出,再查看Queues
Queues额外队列

可以看到有一条待处理消息,没有消费者,发出1条消息,接收0条消息。

这里tenny:test队列的消费者有3个,因为之前启动的监听器都是针对队列tenny:test的,并没有监听这个新的panda队列。

修改activemq.properties

1
2
# 目的队列的名称
activemq.queue.name=panda

再运行TestActivemq.java,可以看到控制台输出

1
2
receive message from queue://panda: some information...

说明这次启动的监听器收到了之前的和当前的消息。

再查看Queues界面,新的队列panda也有一个消费者,发送2条,接收2条(即刚才启动的针对队列panda的监听器接收)。
Queues新消费者

7.总结

  • 消息按队列区分(如这里的tenny:test和panda),每一个队列有生产者(发送消息)和消费者(接收消息)。当没有消费者的时候,生成者的消息就暂时悬挂起来,一旦有消费者空闲,就会接收消息。

  • 在测试中,已启动两次TestActivemq.java后,不修改测试代码,继续运行多次TestActivemq.java。可以发现,每次运行后,发送的消息都是由之前的多个监听器随机接收。

  • 这里测试直接使用了jmsTemplate,实际应用中,应该写一个service,将jmsTemplate作为私有变量,通过spring注入。然后根据业务封装自己发送的消息。

  • 可以为每个业务模块配置单独的activemq.properties,编写对应的生产者service和监听器。每个模块的消息互不干扰。

hexo+github搭建博客

发表于 2017-04-21 | 分类于 hexo+github博客

Hexo是一款基于Node.js的静态博客框架,配合github可以搭建属于自己的博客。

搭建环境

安装Node.js

Hexo需要node.js支持,可以到node.js中文网下载适合自己系统的安装包。安装也比较简单,一路next下去就可以了。

安装完后win + r 输入cmd回车,打开命令行界面,分别输入node -v 和npm -v,看到类似如下结果就说明安装成功了。

1
2
3
4
>node -v
v6.10.1
>npm -v
3.10.10

安装Hexo

在合适的地方建立一个文件夹,用于安装hexo框架和存放你的博客。我的文件夹是D:\devsoft\hexo。

命令行切换到hexo目录

1
2
3
4
5
6
7
C:\Users\tenny>d:
D:\>cd devsoft
D:\devsoft>cd hexo
D:\devsoft\hexo>

输入如下命令安装hexo到当前目录

1
npm install hexo-cli -g

命令行显示一系列安装详情,等待片刻,完成后,继续输入

1
npm install hexo --save

又会看到一堆信息,完成后,输入hexo -v检查下,看到类似如下信息,说明安装成功了。

1
2
3
4
5
6
7
8
9
10
11
12
13
D:\devsoft\hexo>hexo -v
hexo: 3.2.2
hexo-cli: 1.0.2
os: Windows_NT 10.0.14393 win32 x64
http_parser: 2.7.0
node: 6.10.1
v8: 5.1.281.95
uv: 1.9.1
zlib: 1.2.8
ares: 1.10.1-DEV
icu: 58.2
modules: 48
openssl: 1.0.2k

配置Hexo

命令行还在hexo根目录,输入

1
hexo init

继续输入

1
npm -install

npm会自动安装需要的组件。之后输入

1
npm install hexo-deployer-git --save

hexo扩展,用于将博客发布到github上。

体验博客

本地博客

继续输入hexo g生成文件

1
2
3
4
5
6
7
8
9
10
11
12
13
14
D:\devsoft\hexo>hexo g
INFO Start processing
INFO Files loaded in 2.28 s
INFO Generated: search.xml
INFO Generated: sitemap.xml
INFO Generated: atom.xml
INFO Generated: index.html
INFO Generated: categories/index.html
INFO Generated: about/index.html
INFO Generated: tags/index.html
INFO Generated: archives/index.html
INFO Generated: favicon.ico
INFO Generated: archives/2017/04/index.html
...... //省略的文件信息

再输入hexo s启动服务

1
2
3
D:\devsoft\hexo>hexo s
INFO Start processing
INFO Hexo is running at http://localhost:4000/. Press Ctrl+C to stop.

在浏览器中输入http://localhost:4000/ 就可以看到博客首页了。

要停止服务,在命令行按Ctrl + C。

建立博客仓库

进入https://github.com/ 登录自己的账号,新建一个仓库,命名为yourname.github.io(这个就是你博客的访问地址,一定要这种格式,否则无效)。例如我的tenny-peng.github.io。

关于安装git和github可以参考我的Git简单教程,这里就略过了。

建立好自己的博客仓库(yourname.github.io)后,打开hexo根目录下的_config.yml,找到Deployment,修改成如下内容

1
2
3
4
5
6
# Deployment
## Docs: https://hexo.io/docs/deployment.html
deploy:
type: git
repo: git@github.com:yourname/yourname.github.io.git
branch: master

例如我的

1
2
3
4
5
6
# Deployment
## Docs: https://hexo.io/docs/deployment.html
deploy:
type: git
repo: git@github.com:tenny-peng/tenny-peng.github.io.git
branch: master

编写博客

hexo根目录下执行

1
hexo new title "test"

然后在D:\devsoft\hexo\source_posts下就能看到test.md文件了。

.md文件是用MarkDown语法写的,关于MarkDown语法,可以参考我的MarkDown基础语法。
MarkDown文件编辑器推荐用Atom,Atom是Github专门为程序员推出的一个跨平台文本编辑器。可以到https://atom.io/ 下载Atom,也可以找寻其他自己喜欢的MarkDown编辑器。

部署博客

文章编辑完后,使用命令生成,部署

1
2
hexo g //生成静态文件
hexo d //部署到github上

也可以直接执行以下命令,相当于上面两条命令一起执行

1
hexo d -g //部署前先生成

部署完成后,访问https://yourname.github.io (例如我的https://tenny-peng.github.io) ,就可以看到生成的文章。

使用主题

主题可以使我们的博客更加个性化,更加美观,等等。
这里我使用了NexT主题,其他主题配置可参考其说明,下面以NexT为例。

安装NexT

Hexo 安装主题的方式非常简单,只需要将主题文件拷贝至站点目录的 themes 目录下, 然后修改下配置文件即可。

如果你熟悉Git,建议你使用克隆最新版本的方式,之后的更新可以通过git pull来快速更新,而不用再次下载压缩包替换。这里我们使用git。

命令行切换到hexo根目录,执行

1
git clone https://github.com/iissnan/hexo-theme-next themes/next

启用主题

找到hexo根目录下的站点配置文件_config.yml,修改theme

1
theme: next

设定Scheme

Scheme 是 NexT 提供的一种特性,借助于 Scheme,NexT 为你提供多种不同的外观。同时,几乎所有的配置都可以 在 Scheme 之间共用。目前 NexT 支持三种 Scheme,他们是:

  • Muse - 默认 Scheme,这是 NexT 最初的版本,黑白主调,大量留白
  • Mist - Muse 的紧凑版本,整洁有序的单栏外观
  • Pisces - 双栏 Scheme,小家碧玉似的清新

找到主题next目录下的_config.yml(注意:不是hexo根目录下的配置文件,根目录下的是全局博客配置,这个是针对某个主题的配置),设定自己喜欢的Scheme,使用的去掉#,不使用的注释#。

1
2
3
4
5
6
7
8
# ---------------------------------------------------------------
# Scheme Settings
# ---------------------------------------------------------------
# Schemes
#scheme: Muse
#scheme: Mist
scheme: Pisces

站点设置

编辑站点配置文件,设置博客标题,作者,语言等,更多配置可自行查询。

1
2
3
4
# Site
title: Tenny's Blog
author: Tenny Peng
language: zh-Hans //简体中文

菜单配置

编辑主题配置文件,设置首页分类标签等目录,更多配置可自行查询。

1
2
3
4
5
6
menu:
home: /
categories: /categories
about: /about
archives: /archives
tags: /tags

这里设定的目录都必须手动创建在hexo/source目录下,否则发布到github上是找不到的。

头像设置

编辑主题配置文件,修改avatar(如没有可新建)

1
avatar: /images/avatar.jpg

这里的图片需要放在主题目录下(themes/next/source/images/avatar.jpg),而不是站点目录。

网站图标

编辑主图配置文件,修改favicon

1
favicon: /favicon.ico

然后将favicon.ico放在hexo/source目录下即可。

以上基本就完成了个人博客的搭建,更多信息可参考:

史上最详细的Hexo博客搭建图文教程

hexo官网

next文档

spring整合redis

发表于 2017-04-21 | 分类于 redis

概念简介:

  • Redis:一款开源的Key-Value数据库。
  • Jedis:Redis官方推出的一款面向Java的客户端,提供了很多接口供Java语言调用。
  • Spring Data Redis:SDR是Spring官方推出,可以算是Spring框架集成Redis操作的一个子框架,封装了Redis的很多命令,可以很方便的使用Spring操作Redis数据库。

这三个究竟有什么区别呢?可以简单的这么理解,Redis是用ANSI C写的一个基于内存的Key-Value数据库,而Jedis是Redis官方推出的面向Java的Client,提供了很多接口和方法,可以让Java操作使用Redis,而Spring Data Redis是对Jedis进行了封装,集成了Jedis的一些命令和方法,可以与Spring整合。在后面的配置文件(spring-redis.xml)中可以看到,Spring是通过Jedis类来初始化connectionFactory的。

spring整合redis

  1. maven添加依赖配置

    1
    2
    3
    4
    5
    6
    7
    8
    9
    10
    11
    <dependency>
    <groupId>org.springframework.data</groupId>
    <artifactId>spring-data-redis</artifactId>
    <version>1.4.1.RELEASE</version>
    </dependency>
    <dependency>
    <groupId>redis.clients</groupId>
    <artifactId>jedis</artifactId>
    <version>2.6.1</version>
    </dependency>
  2. redis.properties

    1
    2
    3
    4
    5
    6
    7
    8
    9
    # Redis settings
    redis.host=localhost
    redis.port=6379
    redis.pass=tenny
    redis.maxTotal=200
    redis.maxIdle=50
    redis.minIdle=300
    redis.maxWaitMillis=1000
    redis.testOnBorrow=true
  3. spring-redis.xml

    1
    2
    3
    4
    5
    6
    7
    8
    9
    10
    11
    12
    13
    14
    15
    16
    17
    18
    19
    20
    21
    22
    23
    24
    25
    26
    27
    28
    29
    30
    31
    32
    33
    34
    35
    36
    37
    38
    39
    40
    41
    42
    43
    <?xml version="1.0" encoding="UTF-8"?>
    <beans xmlns="http://www.springframework.org/schema/beans"
    xmlns:xsi="http://www.w3.org/2001/XMLSchema-instance"
    xmlns:context="http://www.springframework.org/schema/context"
    xmlns:mvc="http://www.springframework.org/schema/mvc"
    xmlns:p="http://www.springframework.org/schema/p"
    xmlns:c="http://www.springframework.org/schema/c"
    xsi:schemaLocation="http://www.springframework.org/schema/beans
    http://www.springframework.org/schema/beans/spring-beans.xsd
    http://www.springframework.org/schema/context
    http://www.springframework.org/schema/context/spring-context.xsd
    http://www.springframework.org/schema/mvc
    http://www.springframework.org/schema/mvc/spring-mvc.xsd">
    <context:property-placeholder location="classpath:redis.properties" />
    <bean id="poolConfig" class="redis.clients.jedis.JedisPoolConfig">
    <property name="maxTotal" value="${redis.maxTotal}" />
    <property name="maxIdle" value="${redis.maxIdle}" />
    <property name="minIdle" value="${redis.minIdle}" />
    <property name="maxWaitMillis" value="${redis.maxWaitMillis}" />
    <property name="testOnBorrow" value="${redis.testOnBorrow}" />
    </bean>
    <bean id="connectionFactory" class="org.springframework.data.redis.connection.jedis.JedisConnectionFactory"
    p:hostName="${redis.host}" p:port="${redis.port}" p:password="${redis.pass}" c:poolConfig-ref="poolConfig">
    </bean>
    <bean id="redisTemplate" class="org.springframework.data.redis.core.RedisTemplate">
    <property name="connectionFactory" ref="connectionFactory" />
    </bean>
    <bean id="cacheManager" class="org.springframework.data.redis.cache.RedisCacheManager" c:template-ref="redisTemplate">
    <property name="usePrefix" value="true" />
    <property name="cacheNames">
    <set>
    <value>t</value>
    <value>c</value>
    </set>
    </property>
    </bean>
    </beans>
  4. 定义User实体

    1
    2
    3
    4
    5
    6
    7
    8
    9
    10
    11
    12
    13
    14
    15
    16
    17
    18
    19
    20
    21
    22
    23
    24
    25
    26
    27
    28
    29
    30
    31
    32
    33
    34
    35
    36
    37
    38
    39
    40
    41
    42
    43
    44
    45
    46
    47
    48
    49
    50
    51
    52
    53
    54
    55
    56
    57
    58
    import java.io.Serializable;
    import java.util.Date;
    public class User implements Serializable {
    private static final long serialVersionUID = -6683628971480535063L;
    private Integer id;
    private String username;
    private String password;
    private Integer type;
    private Date createTime;
    public Integer getId() {
    return id;
    }
    public void setId(Integer id) {
    this.id = id;
    }
    public String getUsername() {
    return username;
    }
    public void setUsername(String username) {
    this.username = username == null ? null : username.trim();
    }
    public String getPassword() {
    return password;
    }
    public void setPassword(String password) {
    this.password = password == null ? null : password.trim();
    }
    public Integer getType() {
    return type;
    }
    public void setType(Integer type) {
    this.type = type;
    }
    public Date getCreateTime() {
    return createTime;
    }
    public void setCreateTime(Date createTime) {
    this.createTime = createTime;
    }
    }
  5. 测试

    1
    2
    3
    4
    5
    6
    7
    8
    9
    10
    11
    12
    13
    14
    15
    16
    17
    18
    19
    20
    21
    22
    23
    24
    25
    26
    27
    28
    29
    30
    31
    32
    33
    34
    35
    36
    37
    38
    39
    40
    41
    42
    43
    44
    45
    46
    47
    48
    49
    50
    51
    import java.util.Date;
    import org.springframework.cache.Cache;
    import org.springframework.cache.Cache.ValueWrapper;
    import org.springframework.context.support.ClassPathXmlApplicationContext;
    import org.springframework.data.redis.cache.RedisCacheManager;
    import com.news.pojo.User;
    public class TestRedis {
    @SuppressWarnings("resource")
    public static void main(String[] args) {
    ClassPathXmlApplicationContext context = new ClassPathXmlApplicationContext("spring-redis.xml");
    RedisCacheManager cacheManager = (RedisCacheManager) context.getBean("cacheManager");
    System.out.println("cacheNames: " + cacheManager.getCacheNames());
    Cache cacheT = cacheManager.getCache("t");
    Cache cacheC = cacheManager.getCache("c");
    User user1 = new User();
    user1.setId(1);
    user1.setUsername("tenny");
    user1.setPassword("admin");
    user1.setType(1);
    user1.setCreateTime(new Date());
    User user2 = new User();
    user2.setId(2);
    user2.setUsername("panda");
    user2.setPassword("xiaobai");
    user2.setType(2);
    user2.setCreateTime(new Date());
    System.out.println("put two user into cacheT...");
    cacheT.put("user1", user1);
    cacheT.put("user2", user2);
    System.out.println("put name and age into cacheC...");
    cacheC.put("name", "tenny");
    cacheC.put("age", 25);
    System.out.println("get two user from cacheT");
    User value1 = cacheT.get("user1", User.class);
    System.out.println(value1.toString());
    ValueWrapper value2 = cacheT.get("user2");
    System.out.println(value2.get());
    System.out.println("get two user from cacheC");
    ValueWrapper value3 = cacheC.get("name");
    System.out.println(value3.get());
    ValueWrapper value4 = cacheC.get("age");
    System.out.println(value4.get());
    }
    }
  6. 测试结果

    1
    2
    3
    4
    5
    6
    7
    8
    9
    cacheNames: [t, c]
    put two user into cacheT...
    put name and age into cacheC...
    get two user from cacheT
    com.news.pojo.User@2ea227af
    com.news.pojo.User@4386f16
    get two field from cacheC
    tenny
    25
  7. 直接使用redisTemplate

    1
    2
    3
    4
    5
    6
    7
    8
    9
    10
    11
    12
    13
    14
    15
    16
    17
    18
    19
    20
    21
    @SuppressWarnings("unchecked")
    RedisTemplate<String, User> redisTemplate = (RedisTemplate<String, User>) context.getBean("redisTemplate");
    System.out.println("put two user into redisTemplate...");
    redisTemplate.opsForHash().put("user", "user1", user1);
    redisTemplate.opsForHash().put("user", "user2", user2);
    System.out.println("gut two user from redisTemplate...");
    User redisUser1 = (User) redisTemplate.opsForHash().get("user", "user1");
    System.out.println(redisUser1);
    User redisUser2 = (User) redisTemplate.opsForHash().get("user", "user2");
    System.out.println(redisUser2);
    @SuppressWarnings("unchecked")
    RedisTemplate<String, String> redisTemplate2 = (RedisTemplate<String, String>) context.getBean("redisTemplate");
    System.out.println("put color list into redisTemplate2...");
    redisTemplate2.opsForList().leftPush("color", "blue");
    redisTemplate2.opsForList().leftPush("color", "red");
    redisTemplate2.opsForList().rightPush("color", "yellow");
    System.out.println("gut color list from redisTemplate2...");
    List<String> colorList = redisTemplate2.opsForList().range("color", 0, -1);
    System.out.println(colorList);
  8. redisTemplate测试结果

    1
    2
    3
    4
    5
    6
    7
    put two user into redisTemplate...
    gut two user from redisTemplate...
    com.news.pojo.User@4313f5bc
    com.news.pojo.User@7f010382
    put color list into redisTemplate2...
    gut color list from redisTemplate2...
    [red, blue, yellow]

redis设置密码

发表于 2017-04-19 | 分类于 redis

设置密码有两种方式。

  1. 命令行设置密码。

    运行cmd切换到redis根目录,先启动服务端

    1
    >redis-server.exe

    另开一个cmd切换到redis根目录,启动客户端

    1
    >redis-cli.exe -h 127.0.0.1 -p 6379

    客户端使用config get requirepass命令查看密码

    1
    2
    3
    >config get requirepass
    1)"requirepass"
    2)"" //默认空

    客户端使用config set requirepass yourpassword命令设置密码

    1
    2
    >config set requirepass 123456
    >OK

    一旦设置密码,必须先验证通过密码,否则所有操作不可用

    1
    2
    >config get requirepass
    (error)NOAUTH Authentication required

    使用auth password验证密码

    1
    2
    3
    4
    5
    >auth 123456
    >OK
    >config get requirepass
    1)"requirepass"
    2)"123456"

    也可以退出重新登录

    1
    redis-cli.exe -h 127.0.0.1 -p 6379 -a 123456

    命令行设置的密码在服务重启后失效,所以一般不使用这种方式。

  2. 配置文件设置密码

    在redis根目录下找到redis.windows.conf配置文件,搜索requirepass,找到注释密码行,添加密码如下:

    1
    2
    # requirepass foobared
    requirepass tenny //注意,行前不能有空格

    重启服务后,客户端重新登录后发现

    1
    2
    3
    >config get requirepass
    1)"requirepass"
    2)""

    密码还是空?

    网上查询后的办法:创建redis-server.exe 的快捷方式, 右键快捷方式属性,在目标后面增加redis.windows.conf, 这里就是关键,你虽然修改了.conf文件,但是exe却没有使用这个conf,所以我们需要手动指定一下exe按照修改后的conf运行,就OK了。

    所以,这里我再一次重启redis服务(指定配置文件)

    1
    >redis-server.exe redis.windows.conf

    客户端再重新登录,OK了。

    1
    2
    3
    4
    >redis-cli.exe -h 127.0.0.1 -p 6379 -a 123456
    >config get requirepass
    1)"requirepass"
    2)"123456"

    疑问: redis目录下有两个配置文件redis.windows.conf和redis.windows-server.conf,看到网上有的人用前者有的人用后者,不清楚到底该用哪一个。看了下两个文件又没啥区别,个人就用前者了。

redis入门

发表于 2017-04-15 | 分类于 redis

redis简介

Redis 是一个高性能的key-value数据库。

  • Redis可基于内存亦可持久化。
  • Redis 支持存储的value类型丰富,包括string(字符串)、list(链表)、set(集合)、zset(sorted set –有序集合)和hash(哈希类型)
  • Redis性能极高,读的速度可高达110000次/s,写的速度可高达81000次/s 。
  • Redis的所有操作都是原子性的,Redis还支持几个操作合并后的原子性执行。

Redis 下载安装

Redis官方并不支持Windows。 但是,微软针对Win64自己开发了一个windows版的redis并共享到github上。

点击https://github.com/MSOpenTech/redis/releases下载。

选择你喜欢的安装方式,这里我选择压缩版。
下载redis

安装/解压缩后到redis目录找到redis-server.exe和redis-cli.exe
redis目录

双击redis-server.exe启动redis服务
redis服务

双击redis-cli.exe启动客户端,用来访问redis服务。
redis客户端

测试一下,设置x的值为1并获取x。
redis测试

使用redis

redis使用key-value来存储数据。

set & get

使用set命令设置值,并用get命令获取值。

1
2
3
4
> set name "tenny"
OK
> get name
"tenny"

del

del删除一个key

1
2
3
4
> del name
(integer) 1
> get name
(nil)

incr

incr递增一个值,如果key不存在则创造它并初始化值为1

1
2
3
4
5
6
7
8
9
10
11
> set connections 10
OK
> incr connections
(integer) 11
> incr connections
(integer) 12
> del connections
(integer) 1
> incr connections //connections不存在,初始化为1
(integer) 1

setnx

setnx(set-if-not-exists),如果key不存在才改变值。

1
2
3
4
5
6
7
8
9
10
11
12
13
14
15
> set name "panda"
OK
> get name
"panda"
> setnx name "tenny" //因为name存在所以不会改变值
(integer) 0
> get name
"panda"
> get age
(nil)
> setnx age 22 //age不存在,赋值为22
(integer) 1
> get age
"22"

expire & ttl

expire设置生存时间,ttl查看剩余时间。

1
2
3
4
5
6
7
8
9
10
11
12
13
14
15
16
17
18
19
20
21
22
23
24
25
> set name "tenny"
OK
> expire name 120 //设置name生存时间为120秒
(integer) 1
> ttl name
(integer) 80 //剩余80秒
> ttl name //2分钟后
(integer) -2 //-2表示name这个key已经不存在了。
> get name
(nil)
> set name "tenny"
OK
> ttl name
(integer) -1 //默认-1表示永久存在
> expire name 120
(integer) 1
> ttl name
(integer) 118
> get name
"tenny"
> set name "panda" //设置值会重置存在时间
OK
> ttl name
(integer) -1

list操作:rpush & lpush & llen & lrange & lpop & rpop

  • rpush在list末尾添加元素

    1
    2
    3
    4
    > rpush color "blue" //[bule]
    (integer) 1
    > rpush color "red" //[bule, red]
    (integer) 2
  • lpush在list开头添加元素

    1
    2
    > lpush color "yellow" //[yellow, bule, red]
    (integer) 3
  • llen查看list长度

    1
    2
    > llen color
    (integer) 3
  • lrange查看list内容,接受两个参数,开始index和结尾index,如果结尾index为-1,表示直到list末尾。

    1
    2
    3
    4
    5
    6
    7
    8
    9
    10
    11
    12
    13
    > lrange color 0 2
    1) "yellow"
    2) "blue"
    3) "red"
    > lrange color 0 1
    1) "yellow"
    2) "blue"
    > lrange color 1 2
    1) "blue"
    2) "red"
    > lrange color 1 2
    1) "blue"
    2) "red"
  • lpop移除list第一个元素并返回它

    1
    2
    3
    4
    5
    6
    7
    > lpop color
    "yellow"
    > llen color
    (integer) 2
    > lrange color 0 -1
    1) "blue"
    2) "red"
  • rpop移除list最后一个元素并返回它

    1
    2
    3
    4
    5
    6
    > rpop color
    "red"
    > llen color
    (integer) 1
    > lrange color 0 -1
    1) "blue"

set操作:sadd & srem & sismember & smembers & sunion

set类似list,但是元素没有顺序且只能出现一次。

  • sadd添加一个元素到set

    1
    2
    3
    4
    5
    6
    7
    8
    > sadd superpowers "flight" //["flight"]
    (integer) 1
    > sadd superpowers "x-ray vision" //["flight", "x-ray vision"]
    (integer) 1
    > sadd superpowers "reflexes" //["flight", "x-ray vision", "reflexes"]
    (integer) 1
    > SADD superpowers "flight" //重复添加无效
    (integer) 0
  • srem从set中移除一个元素

    1
    2
    > srem superpowers "reflexes" //["flight", "x-ray vision"]
    1
  • sismember测试一个元素是否存在于set,存在返回1,不存在返回0

    1
    2
    3
    4
    > sismember superpowers "flight"
    (integer) 1
    > sismember superpowers "reflexes"
    (integer) 0
  • smembers查看set所有元素

    1
    2
    3
    > sismember superpowers
    1) "x-ray vision"
    2) "flight"
  • sunion联合多个set并返回它们的合集

    1
    2
    3
    4
    5
    6
    7
    8
    9
    10
    11
    12
    13
    14
    > sadd birdpowers "pecking"
    (integer) 1
    > sadd birdpowers "flight"
    (integer) 1
    > smembers birdpowers
    1) "pecking"
    2) "flight"
    > smembers superpowers
    1) "x-ray vision"
    2) "flight"
    > sunion superpowers birdpowers //无序的 sunion birdpowers superpowers结果一样
    1) "pecking"
    2) "flight"
    3) "x-ray vision"

sorted set操作:zadd zrange

有序集合(sorted set)类似集合,不过它每个元素有一个关联值,通过这个关联值对元素进行排序。

  • zadd为一个有序集合添加元素

    1
    2
    3
    4
    5
    6
    7
    8
    9
    10
    11
    12
    13
    14
    15
    16
    > zadd hackers 1940 "Alan Kay"
    (integer) 1
    > zadd hackers 1906 "Grace Hopper"
    (integer) 1
    > zadd hackers 1953 "Richard Stallman"
    (integer) 1
    > zadd hackers 1965 "Yukihiro Matsumoto"
    (integer) 1
    > zadd hackers 1916 "Claude Shannon"
    (integer) 1
    > zadd hackers 1969 "Linus Torvalds"
    (integer) 1
    > zadd hackers 1957 "Sophie Wilson"
    (integer) 1
    > zadd hackers 1912 "Alan Turing"
    (integer) 1
  • zrange类似于lrange,查看sorted set元素。接受两个参数,开始index和结尾index,如果结尾index为-1,表示直到末尾

    1
    2
    3
    4
    5
    6
    7
    8
    9
    > zrange hackers 0 -1
    1) "Grace Hopper"
    2) "Alan Turing"
    3) "Claude Shannon"
    4) "Alan Kay"
    5) "Richard Stallman"
    6) "Sophie Wilson"
    7) "Yukihiro Matsumoto"
    8) "Linus Torvalds"

可以看到元素以年份递增排序。

1
2
3
4
> ZRANGE hackers 2 4
1) "Claude Shannon"
2) "Alan Kay"
3) "Richard Stallman"

hash操作:hset & hget & hgetall & hmset & hincrby & hdel

hash 是一个string类型的field和value的映射表,hash特别适合用于存储对象。

  • hset添加值
    1
    2
    3
    4
    5
    6
    > hset user name "tenny"
    (integer) 1
    > hset user email "tenny@example.com"
    (integer) 1
    > hset user password "cutepanda"
    (integer) 1
  • hget获取值

    1
    2
    > hget user name
    "tenny"
  • hgetall获取所有值

    1
    2
    3
    4
    5
    6
    7
    > hgetall user
    1) "name"
    2) "tenny"
    3) "email"
    4) "tenny@example.com"
    5) "password"
    6) "cutepanda"
  • hmset一次性设置多个值

    1
    2
    3
    4
    5
    6
    7
    8
    9
    > hmset user1 name "tenny1" password "cutepanda1" email "tenny1@example.com"
    OK
    > hgetall user1
    1) "name"
    2) "tenny1"
    3) "password"
    4) "cutepanda1"
    5) "email"
    6) "tenny1@example.com"

可以使用hset继续添加或修改

1
2
3
4
5
6
7
8
9
10
11
12
13
14
15
16
17
18
19
20
21
22
> hset user1 age 22
(integer) 1
> hgetall user1
1) "name"
2) "tenny1"
3) "password"
4) "cutepanda1"
5) "email"
6) "tenny1@example.com"
7) "age"
8) "22"
> hset user1 age 24 //已存在的值重复设定返回0,新值返回1
(integer) 0
> hgetall user1
1) "name"
2) "tenny1"
3) "password"
4) "cutepanda1"
5) "email"
6) "tenny1@example.com"
7) "age"
8) "24"

  • hincrby增加数值型域的值

    1
    2
    3
    4
    5
    6
    > hset user visits 10
    (integer) 1
    > hincrby user visits 1
    (integer) 11
    > hincrby user visits 1
    (integer) 12
  • hdel删除指定的域

    1
    2
    3
    4
    5
    6
    7
    8
    > hdel user visits
    (integer) 1
    > hdel user age //删除不存在的域返回0
    (integer) 0
    > hdel user visits
    (integer) 0
    > hincrby user visits 20 //字段不存在则默认设置为0后再执行此增加操作
    (integer) 20
以上介绍了redis的一些简单命令,可以访问redis中文官方网站了解更多。

Hello World!

发表于 2017-04-08 | 分类于 Java学习记录

开始动手,Hello World!!

是时候编写你自己的第一个Java应用了。

下载JDK

你可以到这里下载JDK并安装。

注意:下载的是JDK,而不是JRE。JRE是java运行环境,用于运行java程序;JDK是java开发工具包,用于开发java程序,其中包含了JRE,所以我们下载JDK就好。

安装完成后,win + r 输入cmd,打开命令行窗口,输入”java -version”,看到类似如下结果就说明安装成功了。

1
2
3
4
C:\Users\Administrator>java -version
java version "1.8.0_102"
Java(TM) SE Runtime Environment (build 1.8.0_102-b14)
Java HotSpot(TM) 64-Bit Server VM (build 25.102-b14, mixed mode)

编辑工具

这里用windows自带的记事本就可以。

创建源文件

在D盘新建一个目录myapplication(你也可以自己选择其他盘符及目录),新建一个记事本文档,将下面代码粘贴或手动输入到文本里:

1
2
3
4
5
6
7
8
9
/**
* The HelloWorldApp class implements an application that
* simply prints "Hello World!" to standard output.
*/
class HelloWorldApp {
public static void main(String[] args) {
System.out.println("Hello World!"); // Display the string.
}
}

注意:Java严格区分大小写,HelloWorldApp不等于helloWorldapp。

将该文件保存为HelloWorldApp.java。

编译

win + r,输入cmd,打开命令行窗口,输入

1
cd d:\myapplication

切换到HelloWorldApp.java文件所在目录。

切换目录使用如下命令:

1
2
3
4
5
C:\>D: //切换到D盘根目录
D:\>cd myapplication //切换到当前目录下的myapplication目录
D:\myapplication> //完成切换。。

继续输入:

1
javac HelloWorldApp.java

如果没有任何信息,应该就编译成功了,查看myapplication目录,发现多出一个HelloWorldApp.class文件,这个就是字节码文件。
如果出现错误提示,请检查文件名和文件内容是否和上述一致。

运行

输入java HelloWorldApp运行程序。

1
2
D:\myapplication>java HelloWorldApp
Hello World!

看到打印出了”Hello World!”说明我们得程序运行成功了。
如果提示错误,请检查文件名和文件内容是否和上述一致。

至此,第一个java应用程序就完成了。

123
Tenny Peng

Tenny Peng

29 日志
20 分类
27 标签
RSS
© 2018 Tenny Peng
由 Hexo 强力驱动
主题 - NexT.Pisces