spring整合activemq

1.安装activemq

http://activemq.apache.org/ 下载最新版。我这里下载的是Windows版。

下载完成之后解压缩,运行bin目录下的activemq.bat,看到类似如下信息说明启动成功。

1
2
3
4
5
6
7
8
9
10
11
12
13
14
15
16
17
18
19
20
21
22
23
24
25
26
27
28
29
30
31
32
33
34
35
ACTIVEMQ_HOME: D:\devsoft\apache-activemq-5.1.0\bin\..
ACTIVEMQ_BASE: D:\devsoft\apache-activemq-5.1.0\bin\..
Loading message broker from: xbean:activemq.xml
INFO BrokerService - Using Persistence Adapter: AMQPersistenceAdapter(D:\devsoft\apache-activemq-5.1.0\bin\..\data)
INFO BrokerService - ActiveMQ 5.1.0 JMS Message Broker (localhost) is starting
INFO BrokerService - For help or more information please see: http://activemq.apache.org/
INFO AMQPersistenceAdapter - AMQStore starting using directory: D:\devsoft\apache-activemq-5.1.0\bin\..\data
INFO KahaStore - Kaha Store using data directory D:\devsoft\apache-activemq-5.1.0\bin\..\data\kr-store\state
INFO AMQPersistenceAdapter - Active data files: []
WARN AMQPersistenceAdapter - The ReferenceStore is not valid - recovering ...
INFO KahaStore - Kaha Store successfully deleted data directory D:\devsoft\apache-activemq-5.1.0\bin\..\data\kr-store\data
INFO AMQPersistenceAdapter - Journal Recovery Started from: DataManager:(data-)
INFO KahaStore - Kaha Store using data directory D:\devsoft\apache-activemq-5.1.0\bin\..\data\kr-store\data
INFO AMQPersistenceAdapter - Recovered 3611 operations from redo log in 0.85 seconds.
INFO AMQPersistenceAdapter - Finished recovering the ReferenceStore
INFO TransportServerThreadSupport - Listening for connections at: tcp://Lenovo-PC:61616
INFO TransportConnector - Connector openwire Started
INFO TransportServerThreadSupport - Listening for connections at: ssl://Lenovo-PC:61617
INFO TransportConnector - Connector ssl Started
INFO TransportServerThreadSupport - Listening for connections at: stomp://Lenovo-PC:61613
INFO TransportConnector - Connector stomp Started
INFO TransportServerThreadSupport - Listening for connections at: xmpp://Lenovo-PC:61222
INFO TransportConnector - Connector xmpp Started
INFO NetworkConnector - Network Connector default-nc Started
INFO BrokerService - ActiveMQ JMS Message Broker (localhost, ID:Lenovo-PC-51314-1493018577517-0:0) started
INFO log - Logging to org.slf4j.impl.JCLLoggerAdapter(org.mortbay.log) via org.mortbay.log.Slf4jLog
INFO log - jetty-6.1.9
INFO WebConsoleStarter - ActiveMQ WebConsole initialized.
INFO /admin - Initializing Spring FrameworkServlet 'dispatcher'
INFO log - ActiveMQ Console at http://0.0.0.0:8161/admin
INFO log - ActiveMQ Web Demos at http://0.0.0.0:8161/demo
INFO log - RESTful file access application at http://0.0.0.0:8161/fileserver
INFO log - Started SelectChannelConnector@0.0.0.0:8161
INFO FailoverTransport - Successfully connected to tcp://localhost:61616
INFO TransportConnector - Connector vm://localhost Started

浏览器输入http://localhost:8161/admin/ 可查看本地activemq运行状态。
activemq主页

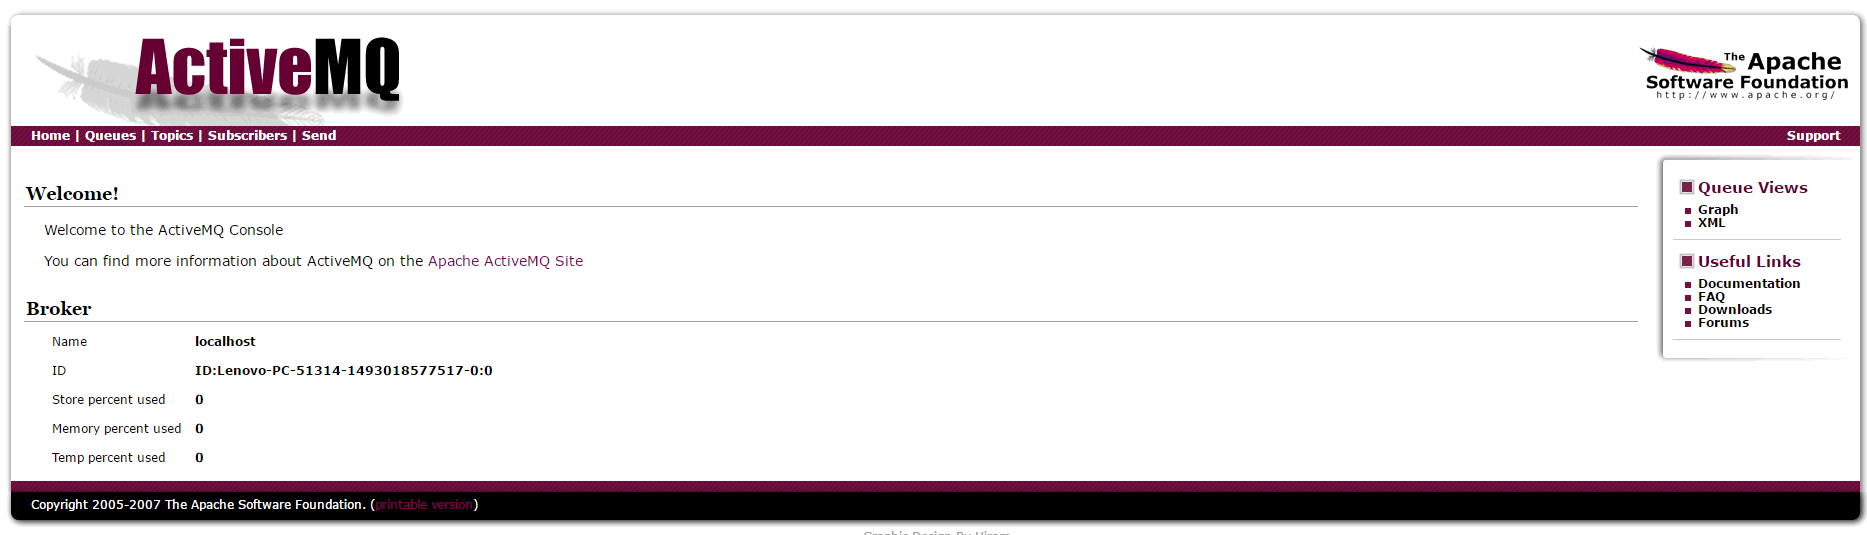
点击”Queues”可查看队列情况。现在没有信息,后面测试的时候会有信息。
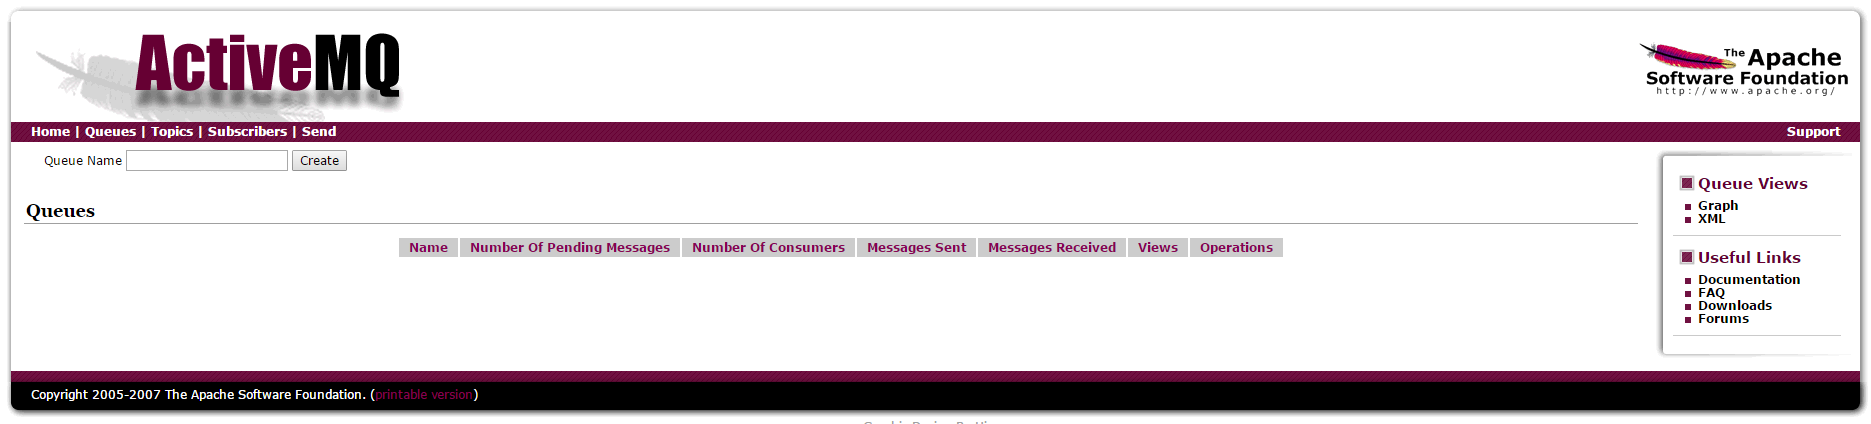
activemq空queues

2.Maven添加依赖

1
2
3
4
5
6
7
8
9
10
11
12
13
14
15
<dependency>
<groupId>org.springframework</groupId>
<artifactId>spring-jms</artifactId>
<version>${spring.version}</version>
</dependency>
<dependency>
<groupId>org.apache.activemq</groupId>
<artifactId>activemq-core</artifactId>
<version>5.7.0</version>
</dependency>
<dependency>
<groupId>org.apache.activemq</groupId>
<artifactId>activemq-pool</artifactId>
<version>5.7.0</version>
</dependency>

3.activemp.properties属性文件

1
2
3
4
5
6
7
8
# 服务器地址
activemq.brokerURL=tcp://localhost:61616
# 连接池的最大连接数
activemq.maxConnections=10
# 目的队列的名称
activemq.queue.name=tenny:test

4.spring-activemq.xml配置文件

1
2
3
4
5
6
7
8
9
10
11
12
13
14
15
16
17
18
19
20
21
22
23
24
25
26
27
28
29
30
31
32
33
34
35
36
37
38
39
40
41
42
43
44
45
46
47
48
49
50
51
52
53
54
55
<?xml version="1.0" encoding="UTF-8"?>
<beans xmlns="http://www.springframework.org/schema/beans"
xmlns:xsi="http://www.w3.org/2001/XMLSchema-instance"
xmlns:context="http://www.springframework.org/schema/context"
xmlns:jms="http://www.springframework.org/schema/jms"
xsi:schemaLocation="http://www.springframework.org/schema/beans
http://www.springframework.org/schema/beans/spring-beans.xsd
http://www.springframework.org/schema/context
http://www.springframework.org/schema/context/spring-context.xsd
http://www.springframework.org/schema/beans
http://www.springframework.org/schema/beans/spring-beans.xsd
http://www.springframework.org/schema/jms
http://www.springframework.org/schema/jms/spring-jms.xsd">
<context:property-placeholder location="classpath:activemq.properties" />
<!-- 真正可以产生Connection的ConnectionFactory,由对应的 JMS服务厂商提供-->
<bean id="targetConnectionFactory" class="org.apache.activemq.ActiveMQConnectionFactory">
<property name="brokerURL" value="${activemq.brokerURL}"/>
</bean>
<bean id="pooledConnectionFactory" class="org.apache.activemq.pool.PooledConnectionFactory" destroy-method="stop">
<property name="connectionFactory" ref="targetConnectionFactory"/>
<property name="maxConnections" value="${activemq.maxConnections}"/>
</bean>
<bean id="connectionFactory" class="org.springframework.jms.connection.SingleConnectionFactory">
<property name="targetConnectionFactory" ref="pooledConnectionFactory"/>
</bean>
<!-- Spring提供的JMS工具类,它可以进行消息发送、接收等 -->
<bean id="jmsTemplate" class="org.springframework.jms.core.JmsTemplate">
<property name="connectionFactory" ref="connectionFactory"/>
<property name="defaultDestinationName" value="${activemq.queue.name}"/>
</bean>
<!--队列目的地,点对点模式-->
<bean id="queueDestination" class="org.apache.activemq.command.ActiveMQQueue">
<constructor-arg>
<value>
${activemq.queue.name}
</value>
</constructor-arg>
</bean>
<!-- 消息监听器 -->
<bean id="activeMQMessageListener" class="com.news.common.activemq.ActiveMQMessageListener" />
<!-- 消息监听容器 -->
<bean id="jmsContainer" class="org.springframework.jms.listener.DefaultMessageListenerContainer">
<property name="connectionFactory" ref="connectionFactory" />
<property name="destination" ref="queueDestination" />
<property name="messageListener" ref="activeMQMessageListener" />
</bean>
</beans>

其中的ActiveMQMessageListener

1
2
3
4
5
6
7
8
9
10
11
12
13
14
15
16
17
18
19
20
21
22
23
24
25
26
package com.news.common.activemq;
import javax.jms.JMSException;
import javax.jms.Message;
import javax.jms.MessageListener;
import javax.jms.TextMessage;
/**
*
* activemq消息监听
*
* @author Tenny.Peng
*/
public class ActiveMQMessageListener implements MessageListener {
@Override
public void onMessage(Message message) {
TextMessage textMsg = (TextMessage) message;
try {
// 处理消息
System.out.println("receive message from " + textMsg.getJMSDestination() + ": " + textMsg.getText());
} catch (JMSException e) {
e.printStackTrace();
}
}
}

5.测试类TestActivemq.java

1
2
3
4
5
6
7
8
9
10
11
12
13
14
15
16
17
18
19
20
21
22
23
24
25
26
27
28
29
30
31
32
33
34
package news;
import javax.jms.JMSException;
import javax.jms.Message;
import javax.jms.Session;
import org.springframework.context.support.ClassPathXmlApplicationContext;
import org.springframework.jms.core.JmsTemplate;
import org.springframework.jms.core.MessageCreator;
/**
* TODO
*
* @author tenny.peng
*/
public class TestActivemq {
public static void main(String[] args) {
@SuppressWarnings("resource")
ClassPathXmlApplicationContext context = new ClassPathXmlApplicationContext("spring-activemq.xml");
JmsTemplate jmsTemplate = (JmsTemplate) context.getBean("jmsTemplate");
final String destinationName = jmsTemplate.getDefaultDestinationName();
jmsTemplate.send(destinationName, new MessageCreator() {
@Override
public Message createMessage(Session session) throws JMSException {
// 消息对象
String message = "some information...";
return session.createTextMessage(message);
}
});
}
}

6.测试

运行一次TestActivemq.java,控制台输出如下,监听器已收到消息。

1
receive message from queue://tenny:test: some information...

查看Queues界面。没有待处理消息,有1个消费者,已发送/接收了1条信息。
Queues一条消息

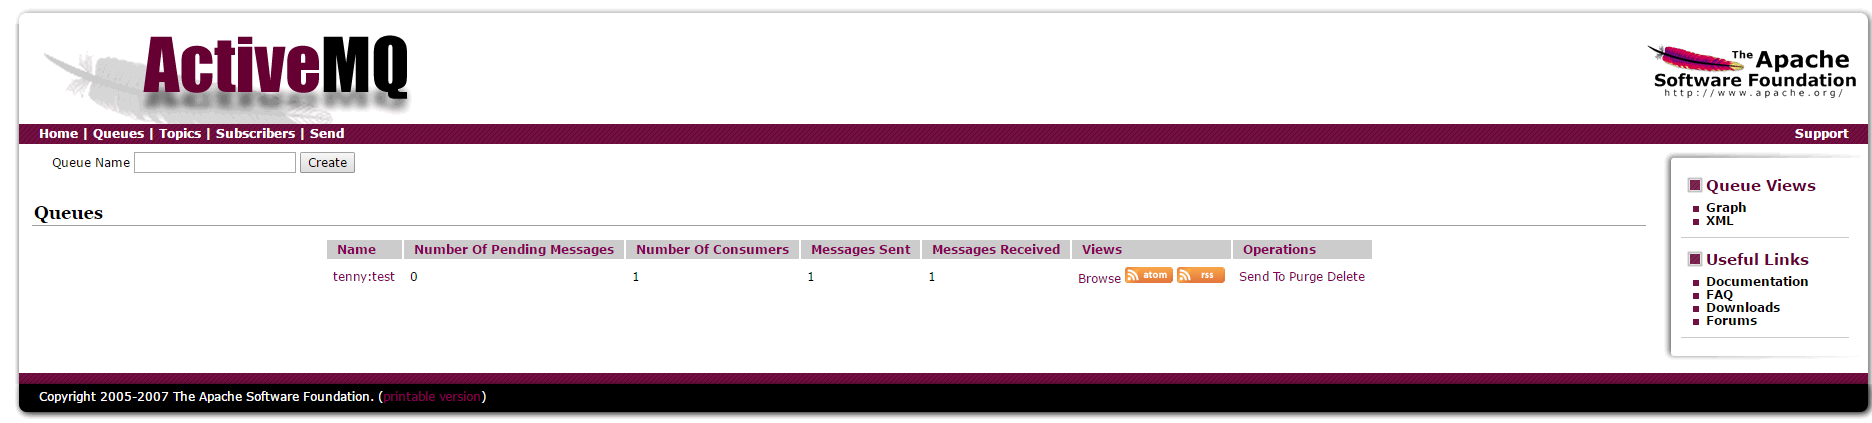
之前的控制台不要关,再运行一次TestActivemq.java,之前的控制台输出如下

1
receive message from queue://tenny:test: some information...

说明之前的监听器又收到了消息。

再查看Queues界面。有2个消费者,已发送/接收了2条消息。
Queues两条消息

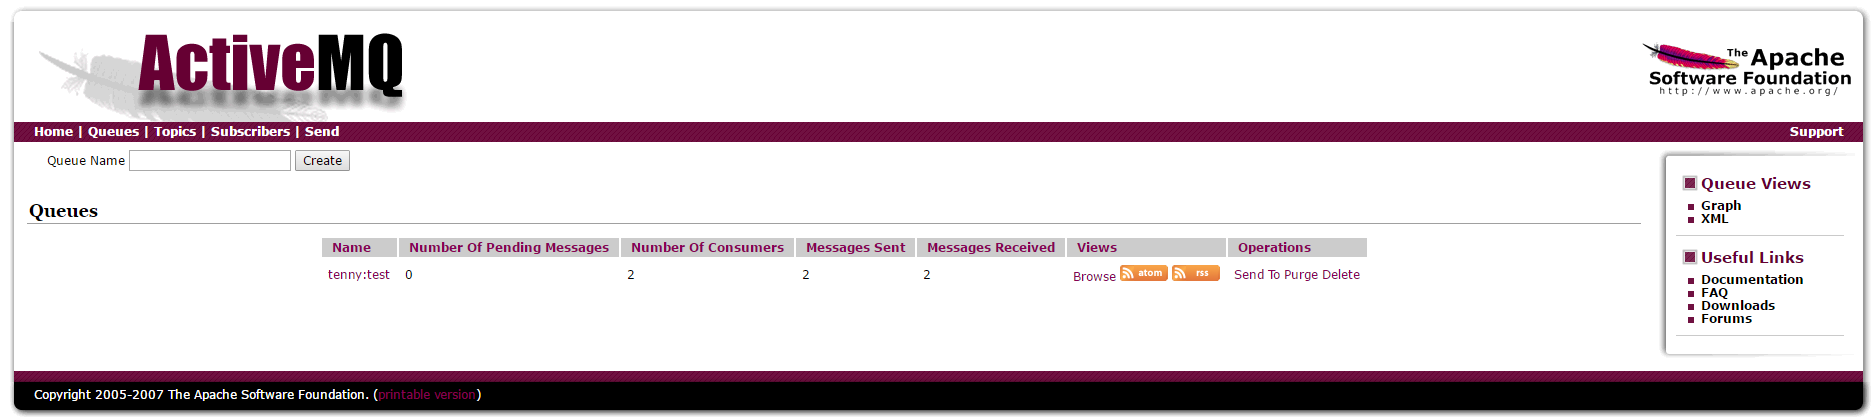
还是不关控制台,修改TestActivemq.java中发送消息的destinationName

1
jmsTemplate.send("panda", new MessageCreator()

再运行TestActivemq.java,控制台没有任何输出,再查看Queues
Queues额外队列

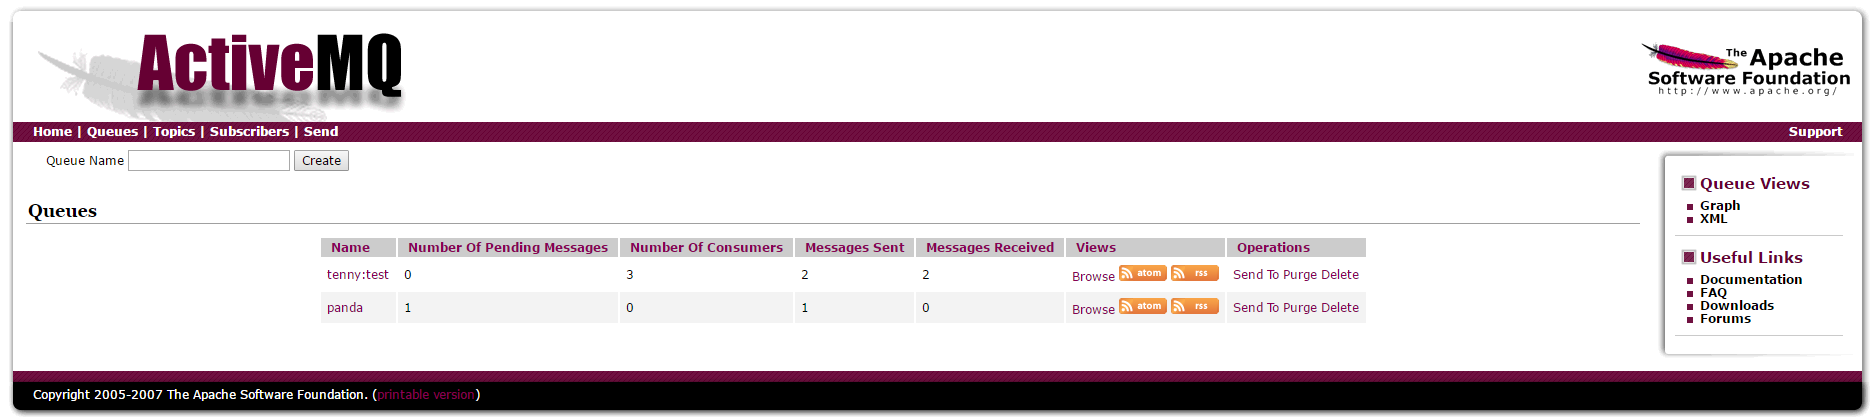
可以看到有一条待处理消息,没有消费者,发出1条消息,接收0条消息。

这里tenny:test队列的消费者有3个,因为之前启动的监听器都是针对队列tenny:test的,并没有监听这个新的panda队列。

修改activemq.properties

1
2
# 目的队列的名称
activemq.queue.name=panda

再运行TestActivemq.java,可以看到控制台输出

1
2
receive message from queue://panda: some information...

说明这次启动的监听器收到了之前的和当前的消息。

再查看Queues界面,新的队列panda也有一个消费者,发送2条,接收2条(即刚才启动的针对队列panda的监听器接收)。
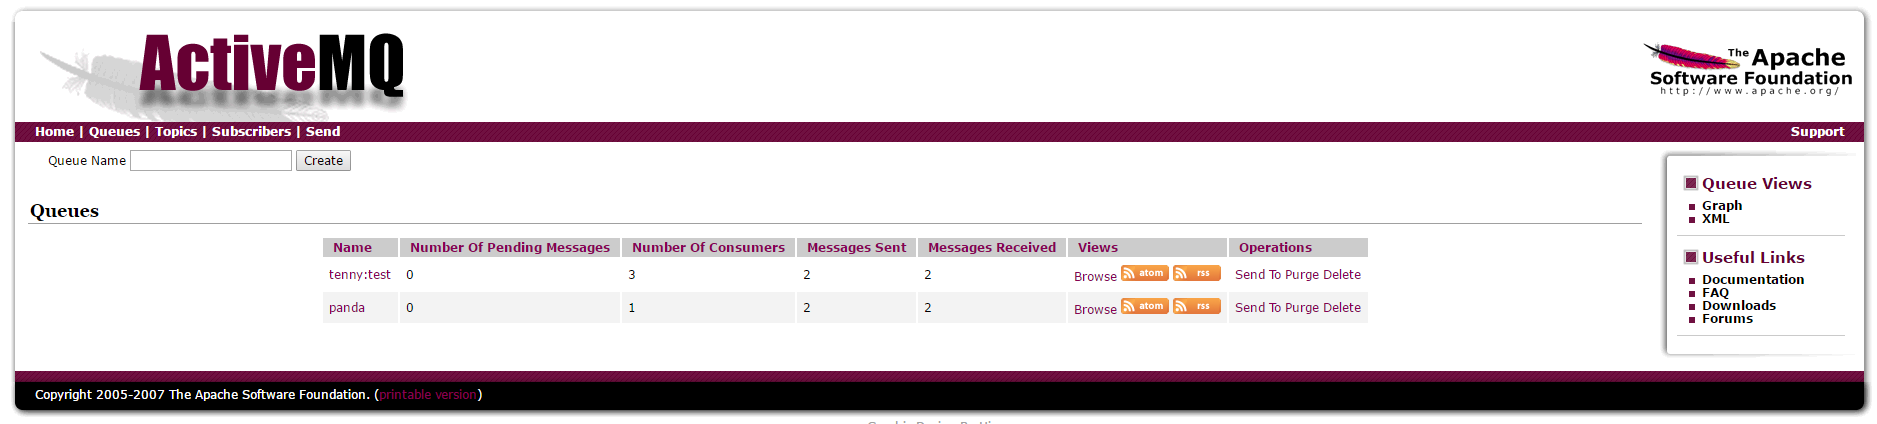
Queues新消费者

7.总结

  • 消息按队列区分(如这里的tenny:test和panda),每一个队列有生产者(发送消息)和消费者(接收消息)。当没有消费者的时候,生成者的消息就暂时悬挂起来,一旦有消费者空闲,就会接收消息。

  • 在测试中,已启动两次TestActivemq.java后,不修改测试代码,继续运行多次TestActivemq.java。可以发现,每次运行后,发送的消息都是由之前的多个监听器随机接收。

  • 这里测试直接使用了jmsTemplate,实际应用中,应该写一个service,将jmsTemplate作为私有变量,通过spring注入。然后根据业务封装自己发送的消息。

  • 可以为每个业务模块配置单独的activemq.properties,编写对应的生产者service和监听器。每个模块的消息互不干扰。

如果觉得我的文章对您有用,请随意打赏。您的支持将鼓励我继续创作!